


Crochet Ribbing: Back-Loop and Post-Stitch Practice
By The Slow Stitch · Terminology: US Crochet Terms · Reading time: 10 min read · theslowstitch.com
A ribbed surface is useful only if you understand how it was built. Short rows worked through back loops and rows of alternating post stitches put their ridges in different relationships to the direction of work. They also feel and move differently.
Make two small, separate practice pieces before choosing a method for a band. The exercises below teach the stitch placement and counting. They are not sized cuffs, interchangeable gauge samples or a promise that either fabric will return to its original size after stretching.
All stitch names are in US terminology. US single crochet is UK double crochet; US double crochet is UK treble. The turning chains in both exercises are explicitly uncounted.
What You'll Learn
By the end of this tutorial you will be able to:
- Make a six-stitch BLO practice piece with uncounted turning chains
- Make an eight-stitch post-pattern piece with separate ordinary edges
- Read raised and recessed columns after turning
- Compare construction direction, extension and recovery separately
- Recognise edge-height differences without tightening the post stitches
What You Need
The same smooth, visible yarn for two separate small practice pieces; the teaching close-ups use separate demonstration fabrics
A hook suited to the yarn; begin with the same hook for both pieces
Two removable markers or yarn scraps, A ruler or tape for your own measurements, Scissors and a blunt yarn needle
Use the materials above for practice, adjusting the hook if needed for comfortable stitches. For a finished project, follow its pattern’s yarn, gauge and care requirements.
Abbreviations
| Abbr | Full Term |
|---|---|
| sc | single crochet (US) |
| dc | double crochet (US) |
| ch | chain |
| BLO | back loop only |
| FPdc | front post double crochet (US) |
| BPdc | back post double crochet (US) |
Gather yarn and mark the working direction
Use smooth yarn whose strands and stitch tops are easy to see, with a hook that lets you work without forcing it through the fabric. A light or medium solid colour is easier to read than a dark fuzzy one. Start with the same yarn and hook for both pieces so there is one less variable to record. This does not make their finished dimensions equal.
The placement images isolate loops and posts on separate demonstration fabrics; they are not the exact counted pieces below. Use your chosen yarn and hook for both practice pieces.
Keep two removable markers or contrasting yarn scraps nearby. You will use them to identify actual edge stitches, not to create new positions. You also need scissors and a blunt yarn needle to finish the tails.
Before starting, check single crochet, double crochet and the front-loop and back-loop lesson. For the second piece, the post-stitch lesson explains the two routes around a stitch body. You need to recognise a stitch's post separately from its top V. The stitch-anatomy guide helps locate those parts.
Piece A: make six ordinary single crochets
Chain seven. The active loop on the hook is not one of those seven chains.
Starting in the second chain from the hook, make one ordinary single crochet in each remaining chain. There are six available chain positions and six completed stitches. Use the same foundation-chain insertion choice across this row so that its edge is consistent.
Mark the first and last stitch tops if needed. Count the six new Vs along the top edge, leaving the active loop outside the count. This is row one; it establishes a base for the back-loop rows.
Piece A: work five back-loop-only rows
Chain one and turn. That chain is a height adjustment in this exercise, not a seventh stitch.
Identify the top V of the first actual stitch. The strand farther from you in the current working view is its back loop. Insert beneath that single intact strand, leaving the nearer strand unused. Yarn over and draw up a working loop, then yarn over and draw through both working loops. One single crochet is complete.
Work the same movement into the back loop of each of the next five stitches. Stop after six stitches. Do not add a stitch into the turning chain.
Repeat that row four more times, making six back-loop-only single crochets each time. Turn and chain one between rows, but stop after completing row six. You have made five BLO rows above the ordinary foundation row.
Re-identify the farther strand after every turn. Do not alternate BLO and FLO to chase a ridge on one chosen face: this exercise uses BLO on every row after row one. Keep the unused strands below the current working edge separate from the new stitch tops you are counting.
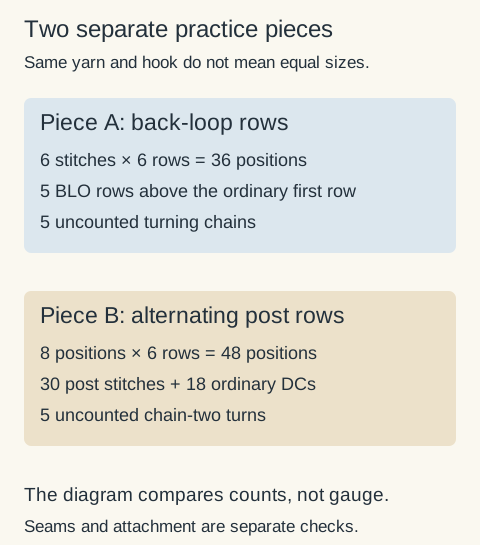
The piece contains six rows of six stitches, or thirty-six completed stitch positions. There are five between-row turning chains, outside that total. A visible ridge is not necessarily a whole row, so use the row-counting guide rather than assuming each raised line represents one row.

Piece B: make eight ordinary double crochets
Make a second piece from a new length of yarn. Chain ten. Work one US double crochet into the third chain from the hook, then one into each remaining chain: eight double crochets altogether.
For clarity, the double-crochet movement is yarn over, insert into the selected chain, yarn over and draw up a loop. With three working loops on the hook, yarn over and draw through two; yarn over again and draw through the final two.
The two skipped foundation chains do not count as an extra stitch in this exercise. Mark the first and eighth actual double crochets. You need all eight posts for the next row: two outside edge stitches and six interior positions. Do not count the skipped chains as a ninth post.
Using a chain-two height adjustment with uncounted turning chains is the stated convention for this small sample. Other patterns may count a chain-three as a stitch. Their first insertion and final edge position must follow their own instructions.
Piece B: place six alternating post stitches
Chain two and turn. The chain two does not count. Work one ordinary double crochet under both top loops of the first stitch. This is the first edge stitch.
There are six interior base stitches before the last edge stitch. Across them, work this pair three times: one front post double crochet around the next post, then one back post double crochet around the following post.
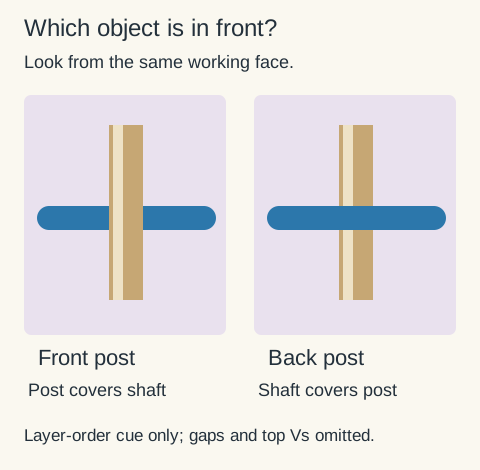
For a front post double crochet, yarn over first. Approach from the working front, pass the hook through the opening beside the designated post, around that post and back out to the front through the opening on its other side. The hook surrounds the post rather than entering its top V. Yarn over and draw a loop around the post, bringing it to a comfortable working height. Finish with the ordinary double-crochet pull-throughs: through two loops, then through two.
For a back post double crochet, yarn over first. Approach from behind the fabric through the gap beside the designated post, pass across its front, then return through the other gap to the back. The shaft lies in front of that post. Yarn over and draw the working yarn around the post, then finish the same two pull-throughs. Tilt the fabric if you need to see the path. You should encircle one post, not catch a neighbouring post or only a stray strand.
After the three front/back pairs, work one ordinary double crochet into both top loops of the last base stitch. Count eight new tops: one edge, six post stitches and one edge. The uncounted turning chain stays outside that count.
Post stitches can sit lower than ordinary double crochets because their bases wrap around the row below. The ordinary edge stitches in this placement exercise may therefore stand taller. Do not pull the post stitches tight to force equal height. A finished pattern may specify shorter edge stitches; follow its instructions when making a band.
Each post stitch replaces the ordinary stitch that would use that base position. Do not work an extra double crochet into the unused top V behind it. That would add stitches rather than make this ribbing.

 View diagram larger (opens in a new tab)
Piece B: turn without shifting the columns
Chain two and turn again. Work one ordinary double crochet into the first edge stitch, then repeat the front-post/back-post pair three times over the six interior posts. End with one ordinary double crochet into the last edge stitch.
The same written pair works on this return row because there are six alternating interior positions. The previous row's final interior back post is now the first interior post approached from the reverse face. It presents a raised post towards you, and you work a front post around it. The next old front post appears recessed from this new view and receives a back post.
This distinction matters: repeating a label attached to a stitch on the previous working face is different from reading that stitch after turning. Keep the raised and recessed columns aligned on a chosen display face. If they switch places, inspect the row before adding more height.
Continue the same row until this second piece also has six rows in total. Every row has eight completed stitches, so the six rows contain forty-eight positions. Rows two to six contain thirty post stitches altogether: five rows times six interior posts. The remaining eighteen positions are ordinary double crochets, including the initial row and the outside edges.
This even interior count and two ordinary edges are part of the exercise. With a different number of columns, a different repeat or unturned rounds, the return-row instruction may change. Read the actual placement and turning instructions again before changing this repeat.
 View diagram larger (opens in a new tab)
Compare direction before comparing movement
Lay both pieces down without pulling them flat. Label which way the stitches run within one row and which way the rows accumulate.
In a band built from short BLO rows sideways, the six stitches in each short row would establish its depth. Adding rows would extend the strip in the direction that could become its circumference. These six practice rows are only a small section, not a finished band length.
The alternating post piece builds raised and recessed columns through successive rows. Its across-column direction runs along the stitches within a row. Do not rotate one piece and then compare measurements as though the construction directions were unchanged.
The pieces deliberately have different stitch counts and heights. Compare where they flex and how their ridges sit; do not conclude that six BLO stitches equal eight post-pattern stitches in width, or that six rows of each have the same height.
Texture is the surface you can see and feel. Extension is the extra length during movement. Recovery is what happens when the fabric is released and allowed to rest. Check those separately. A piece can open readily and still remain larger afterwards.
Finish the samples and record their limits
Fasten off each piece and secure its tails using a route suited to the actual fabric. The weaving-ends guide explains why a secure finish needs to allow the fabric's intended movement.
Record yarn, hook, row counts, stitch counts and relaxed measurements. If you gently extend a marked section, use the same handling for a later comparison and record its size after release too. Hand stretching is an observation, not a calibrated test or a ready-made fit allowance. Stop before damaging the yarn or stitches.
Repeat the assessment after the intended, yarn-compatible care treatment. A finished cuff or hat brim also needs a suitable seam and attachment. Neither exercise supplies that garment construction, and a tight connection can restrict an otherwise flexible band.
Choose between the approaches from their actual construction and the job the fabric needs to do. Terms such as brioche effect or knit look can describe an appearance; they do not, on their own, specify a new stitch method. Keep the actual placement, turning rules and measurements with your notes so you can reproduce the fabric you chose.
Ready for your next little make?
Keep learning with this free lesson, or explore complete crochet project PDFs in the shop, with materials, measurements, construction photos and finishing guidance.
What to Make Next
Three logical next steps to continue practicing:
Front Post and Back Post Double Crochet
Rehearse both routes around one post.
Blocking and Yarn Care: Shape and Finish Your Crochet
Assess the fabric after care suited to the actual yarn.
Moss Stitch (Linen Stitch): The Most Satisfying Woven Texture
Compare a different placement into chain spaces.