

Crochet Ribbing: Compare Back-Loop and Post-Stitch Fabric
Ridges can make crochet look ribbed without giving it the stretch or recovery a cuff needs. Choose ribbing by how the actual fabric moves in the intended direction, as well as how its lines look. This guide uses US terms and compares two common approaches.

A complete pattern must supply its stitch definition, construction direction, measurements and attachment method.
Separate texture, stretch and recovery
Texture describes the ridges. Stretch describes how much the fabric can extend. Recovery describes how it returns after that extension. A sample that opens easily but remains larger afterwards behaves differently from one that springs back.
Look at the intended job. A decorative edge may mainly need a repeated texture. A functional band may need to expand over a hand or head and then sit at a specified measurement. A ridge alone does not establish that function.
Use the actual yarn and stitch pattern when checking it. Fibre names and a photograph cannot supply the missing recovery measurement.
Back-loop ribbing: follow the row direction
Working short turned rows into back loops can create ridges that separate as the fabric moves. The stitch height and loop placement affect the result, and slip-stitch, single-crochet and half-double versions are different fabrics.
Mark the direction of the rows on your sample. A band made from short rows sideways may use the length accumulated over many rows as its circumference, while the stitches within a short row establish the band's depth. Check the design rather than assuming stitch count always controls the circumference.
The single crochet lesson and half double crochet lesson explain the ordinary movements. The front and back loop lesson shows how to identify the top strands. Turning-chain treatment must still be specified for the chosen ribbing.
Post-stitch ribbing: follow the columns
Alternating front and back post stitches can create raised and recessed columns. You work around designated stitch bodies rather than under their top loops. That changes the yarn path and can produce a different thickness from a back-loop band.
When rows turn, the face towards you changes. The pattern must preserve the intended columns by its front/back instructions. In unturned rounds, the relationship can differ. Do not repeat a remembered front/back sequence without checking the previous row and working face.
Post stitches already use designated base positions. Also working their unused top loops as extra ordinary stitches can change the count. The double crochet lesson helps identify the posts and counted edges before adding this placement variation.
Measure both directions
Label the intended stretching direction. Measure the sample relaxed, extend it in a controlled way suitable for the fabric, then let it rest and measure again. Use consistent handling for comparisons and record the method; a hand-stretched sample is not a calibrated strength test.
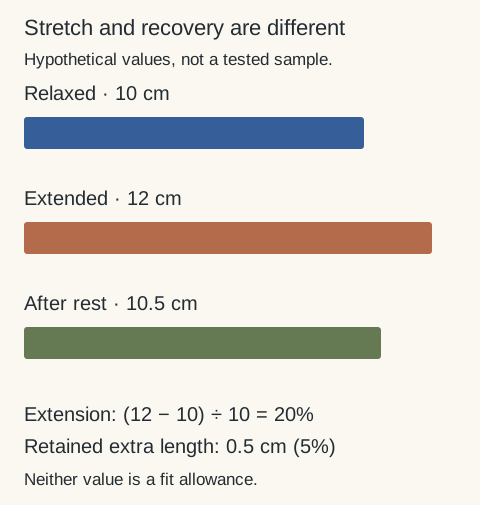
For a hypothetical observation, a 10 cm section might reach 12 cm during handling and settle at 10.5 cm afterwards. It extended by 2 cm, or 20% of its original length, but retained 0.5 cm of extra length at that observation. Those are different facts. The example is not a recommended fit allowance or a measured result for a particular yarn.
Check after the care treatment intended for the finished piece too. The blocking and care lesson explains the material restrictions. Compare both samples in the same condition.
Test the seam and attachment
A flexible band can be restricted by a tight joining seam or an attachment edge that does not allow the same movement. Include those connections in a sample before deciding the band will fit.
When attaching short rows as you go, the number and placement of attachments along the main edge affect the result. One attachment per body stitch is not a universal ratio. Follow the pattern and inspect the connected fabric for gathering or flare.
Record the ribbing's relaxed measurement, construction direction, seam and attachment alongside the gauge measurements. Choose between methods from that complete sample, not from a promise that every back-loop or post-stitch band has the same elasticity.
A tape measure and a clear ruler
Use a flexible tape for body measurements and a ruler or gauge tool to count stitches across a flat sample. Check centimetre and inch markings. Measure without stretching the fabric and follow the pattern’s gauge instructions.
Dritz 60-inch Tape Measure, Inches and CentimetresView on Amazon Westcott 10561 Clear Acrylic Ruler, 6 InchesView on AmazonYour next step
Keep making. Keep learning.
Follow separate BLO and post-stitch exercises before comparing the fabric’s movement.
Practise two counted ribbing pieces