

How to Read a Crochet Pattern for Beginners
A crochet pattern can look crowded when you first open it. There are short words, brackets and numbers everywhere, but they do different jobs.

The abbreviations tell you which stitches to make. The punctuation groups instructions. The stitch totals let you check your work. Start with the notes and materials, then read one complete row before picking up the hook. You do not need to understand the whole project at once. You do need to know what the current instruction asks you to work into, what to repeat and where to stop.
Check the terminology before the first stitch
Look for a note saying US or UK crochet terms. Our lessons use US terms. That matters because the same abbreviation can describe different stitches: US single crochet is UK double crochet, while US double crochet is UK treble.
A photograph alone is not a dependable way to identify the terminology. Read the abbreviation list and any stitch definitions. If the pattern does not state which system it uses, check with its designer before interpreting an ambiguous instruction. Our crochet glossary can help compare named stitches, but it cannot settle an unclear designer-specific abbreviation.
Read the small print above the instructions
The materials list tells you more than what to buy. Check the yarn, hook size, quantities, finished dimensions and gauge. A hook recommendation is a starting point; it does not establish that your stitches match the designer's measurements.
The notes may also explain whether the turning chain counts as a stitch, whether rounds are joined or worked in a spiral, and whether a repeat changes between sizes. Circle or highlight the details relevant to the version you intend to make. If several sizes appear together, follow one consistent position throughout the pattern.
Keep the gauge guide nearby when the finished size matters. Reading every instruction correctly will not compensate for a different stitch gauge.
Separate the stitch from the place it goes
Consider these two instructions in US terminology:
- sc in each of the next 4 sts: make one single crochet in each of four existing stitches. You use four stitches and make four.
- 2 sc in the next st: make two single crochet stitches into one existing stitch. You use one stitch and make two.
The second instruction is an increase. The difference is the placement, not a new way of forming single crochet. Do not treat “2 sc in the next st” as permission to put one stitch into each of the next two places.
If forming the stitch still takes your attention, practise the single crochet lesson first. Reading becomes easier when you recognise the movement the abbreviation names.
Brackets group the part that repeats
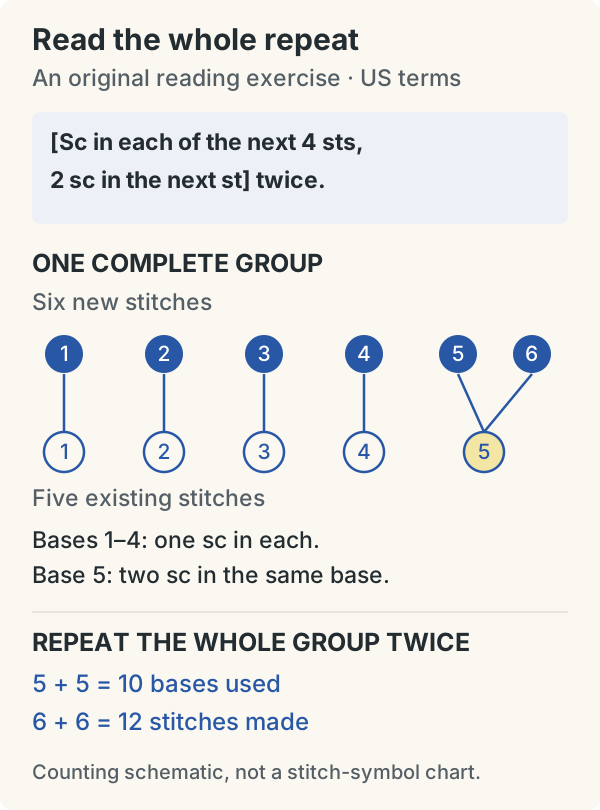
Here is an original reading exercise, assuming ten stitches are available:
[Sc in each of the next 4 sts, 2 sc in the next st] twice.
One complete bracketed group uses five existing stitches: four ordinary single crochets, followed by an increase in the fifth stitch. That group makes six stitches.
Work the whole group twice. You will use ten existing stitches and finish with twelve single crochet stitches. The word “twice” applies to everything inside the brackets, not just the increase at the end.
This example does not include a turning chain or joining instruction, and it is not a complete project pattern. It isolates the repeat so you can check how it works. In a real pattern, follow its starting and ending directions as well.
Asterisks do not always mean the same repeat boundary
Designers may use brackets, parentheses, asterisks or a combination. Read the accompanying words. “Repeat from *” and “repeat between * and **” identify different boundaries. The instruction after the repeat may complete the edge or corner, so do not automatically repeat to the end of the row.
Parentheses can also show information for different sizes rather than a stitch group. Check how the pattern introduces them. Punctuation helps organise the directions; it does not replace the designer's explanation.
Read the stitch total as a checkpoint
A number at the end of a row often gives the expected stitch count. It usually describes the result, not an extra instruction to crochet that many more stitches. Check the pattern's notation before assuming this is what a particular number means.
Count before moving on, especially after shaping. If the total is wrong, inspect the first and last stitch and the repeat boundaries before undoing the whole row. Marking the ends of a flat row can make an accidental extra stitch easier to spot.
Chains and joining slip stitches need particular attention. Whether a turning chain counts depends on the instructions. A loop on the hook is not itself a completed stitch to add to your count.
Keep your place without rewriting the pattern
Mark the row you have finished, not the row you hope to start next. For a long repeat, make a separate note of how many full groups you have completed. The stitch and row counter can hold your count while you work, but it cannot tell whether the stitch placement is correct.
When you stop, leave a short note such as “row 8 complete; next row starts with an increase.” That is easier to return to than a page full of unexplained ticks.
Know when the instructions need clarification
If the stated repeat cannot fit the available stitches, first check the size, row number, terminology and any earlier shaping. Then look for published corrections or contact the designer with the exact row and your current count.
Do not force an unexplained extra stitch into the edge to reach a printed total. A useful question is: “I have ten stitches before this row, but this repeat seems to use twelve. Am I reading the starting count correctly?” It gives the designer something specific to check.
The aim is not to memorise every abbreviation. It is to turn one line into a clear set of actions, check the result and move on with confidence.
If you also have a symbol diagram, use the chart-reading lesson to compare it with the written line. A chart can clarify placement, but its legend and starting point still matter.
Your next step
Keep making. Keep learning.
Use the chart legend and starting point to connect stitch placement with written instructions.
Read the symbols alongside the words