

How to Count Crochet Stitches, Rows and Rounds
Start by deciding what you are counting. The loops along the top of a piece tell you about the stitches in its latest row.

The rows already underneath them are a different count. A chain space, a turning chain and the loop on your hook can each look important without necessarily being an extra stitch. Lay the work down where you can see it clearly, leave the active loop secure and give yourself two reference points: the beginning and the end of the section you need to count. This guide uses US crochet terms.
Find the stitch tops
The top of an ordinary completed crochet stitch has two loops that form a small V. Look along the upper edge of your work and follow those Vs from one end to the other. Unless the instructions say otherwise, the hook usually passes under both loops when you work into a stitch.
Count each completed top once. Do not count its front and back loop separately, and do not count the active loop on the hook as a completed stitch.
If the paired strands are hard to identify, the stitch anatomy lesson separates the top loops from the stitch body and surrounding spaces.
For a plain row containing only single crochet, these stitch tops can give you the row's stitch total. If the row includes chain spaces, clusters, skipped stitches or shaping, read the pattern's counting convention first. A group of several stitch movements may count differently from several ordinary stitches.
Mark the first and last counted positions
Before counting, find out whether the turning chain counts as a stitch. An uncounted turning chain is not an extra position at the edge. A counted turning chain does occupy a position, even though it looks different from the other stitches.
The turning-chain guide compares those two rules and their effect on the first and last positions.
Put a removable marker in the first counted position and another in the last. Then count between them, including the marked positions themselves.
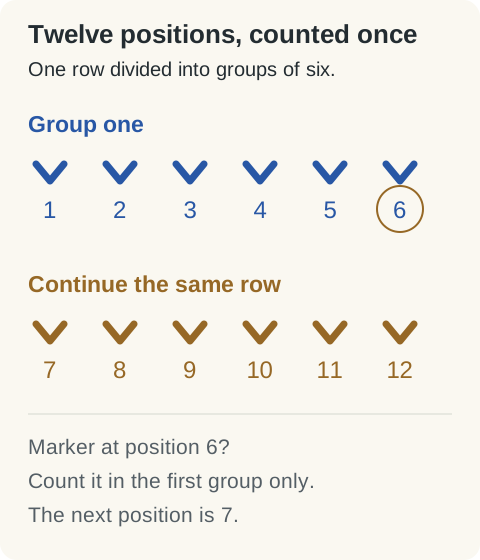
You can check a row of twelve positions in two groups of six. If you place a temporary marker in position six, count that position once in the first group; the next group begins at position seven. Decide what a marker means before using several of them, or the markers can become another thing to count incorrectly.
Count rows from a known starting point
For a rectangular piece, identify the foundation and the first completed row. Do not automatically treat the foundation chain as another row of the main stitch pattern.
Follow the row ends up one side, then compare with the fabric across the middle. Single crochet can show alternating textures on the two faces when worked back and forth. Taller stitches are often easier to see as posts, but their height does not change how many rows were worked.
If texture makes the row boundaries unclear, add a removable marker after a known completed row and keep a written record from that point. You can also mark the same edge at agreed intervals while working. The useful interval is one you can track consistently, not a special number that every project needs.
The single crochet lesson and double crochet lesson are good places to practise recognising the fabric before counting a more complicated texture.
Increases and decreases change the total
An increase puts more than one new stitch into an existing position. A decrease combines existing positions into fewer new stitches. Count the tops of the completed new stitches, not the number of times you inserted the hook.
As a reading example, eight ordinary stitches followed by two increases, each making two stitches in one existing stitch, use ten existing positions and produce twelve new stitches. By contrast, eight ordinary stitches followed by one single-crochet decrease over the next two positions use ten and produce nine.
These are count examples, not complete rows for a project. Follow your pattern's actual placement and total. If the numbers disagree, check the repeat and the edge stitches before changing the instructions.
Count rounds without counting the join twice
In a continuous spiral, a marker in the first stitch makes the beginning visible. Move it into the first stitch of the new round as you reach that point. Count the actual stitches of the round according to the instructions; the marker itself adds nothing.
Joined rounds need a separate check for the starting chain and joining slip stitch. Some chains count and some do not. Do not count the joining slip stitch as an extra ordinary stitch unless the pattern specifically treats it that way.
Our amigurumi basics lesson explains the spiral construction used in its practice exercise. Other projects may use joined or turned rounds.
Use a counter as a record, not a verdict
The stitch and row counter is useful when you know what each press represents. For rows, update it after finishing and checking the row. For a stitch total, decide whether you are recording individual stitches or completed repeat groups.
Do not mix the two halfway through counting. A note saying “five repeats completed” is different from “five stitches completed.”
When you pause, write the completed row or round and the expected count. If you return to a number that seems doubtful, recount the fabric rather than trusting the display. A counter remembers your input; it cannot detect a missed stitch.
When two counts disagree
Count again from the marked starting point, using smaller groups. Check both edges, any spaces and the locations of increases or decreases. If possible, compare the result with the previous correct row.
Make a note before undoing anything. Knowing where the first disagreement occurs is more useful than discovering the same problem several rows later.
Locking stitch markers
Openable markers help you find a stitch or the start of a round. A contrasting scrap of yarn works too.
Clover 3033 Quick Locking Stitch Marker SetView on AmazonYour next step
A little help as you make.
Choose whether each press means one stitch, one repeat or one finished row. Recount the fabric whenever the saved total is doubtful.
Record a count you have checked