

Crochet Stitch Anatomy: Tops, Loops, Posts and Spaces
By The Slow Stitch · Terminology: US Crochet Terms · Reading time: 4 min read · theslowstitch.com
Finding the next stitch is often harder than making the stitch itself. Before reaching for the hook, take a moment to look at the edge of your fabric. The top loops, the body below them and any open spaces give you different places to work.
This guide uses US stitch names. Practise on a small piece of smooth, light-coloured crochet, ideally with a row of single crochet and another sample of double crochet to compare.
What You'll Learn
By the end of this tutorial you will be able to:
- Identify the paired top strands of an ordinary stitch
- Distinguish front and back loops in the current working position
- Find the post beneath a stitch top
- Tell a chain space from an individual chain or an unchained gap
What You Need
A small piece of smooth, light-coloured crochet to inspect; single- and double-crochet samples are useful to compare
A hook is useful if you are checking an insertion point; use one suited to the sample yarn
Two openable stitch markers or contrasting yarn scraps, if helpful
Use the materials above for practice, adjusting the hook if needed for comfortable stitches. For a finished project, follow its pattern’s yarn, gauge and care requirements.
Abbreviations
| Abbr | Full Term |
|---|---|
| FLO | front loop only |
| BLO | back loop only |
Look along the top edge
Hold the fabric with the row you are about to work into at the top. Gently tilt that edge towards you. Along it, you should see a line of Vs made from pairs of strands.
For an ordinary stitch worked under both top loops, the hook goes beneath both strands of the selected V. It does not go through the middle of the yarn itself. Splitting a strand can make insertion difficult and leave a different-looking stitch.
Do not use every V anywhere in the fabric as a new insertion point. Stitches lower down also have visible strands. First identify the row or round named by your instructions.

Identify the front and back loops
With the work held ready for the next stitch:
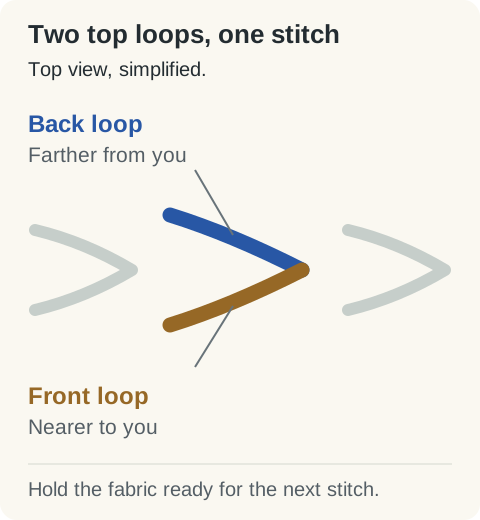
- The front loop is the strand of the top V nearer you.
- The back loop is the strand farther from you.
These names describe the top loops relative to the working position. They do not mean the front and back faces of the entire project. Turning a piece changes which face you are looking at, so reassess the loops in that position.
Instructions for front loop only, or FLO, use the nearer strand. Back loop only, or BLO, uses the farther strand. Unless a pattern says otherwise, ordinary single, half double and double crochet generally go under both top loops.
Half double crochet also has another strand often called its third loop. A pattern using it should specify which strand and face to work from. Do not substitute that strand for the back loop of the top V.
 View diagram larger (opens in a new tab)
Find the post below the V
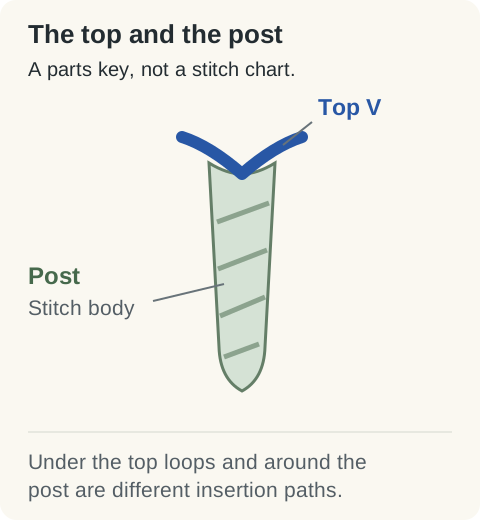
The body extending below a stitch's top is its post. Taller stitches have longer posts, making them easier to distinguish in a double crochet sample than in a compact single crochet sample.
Top-loop stitches and post stitches use different insertion paths. A post stitch passes around the body of a designated stitch. It does not go under that stitch's top V in the usual way.
If a pattern says to work around a post several rows below, identify both the named row and the individual post before making the stitch. A long strand reaching downwards is not automatically permission to skip the next stitch at the top; the pattern must explain the count.
 View diagram larger (opens in a new tab)
Recognise a chain space
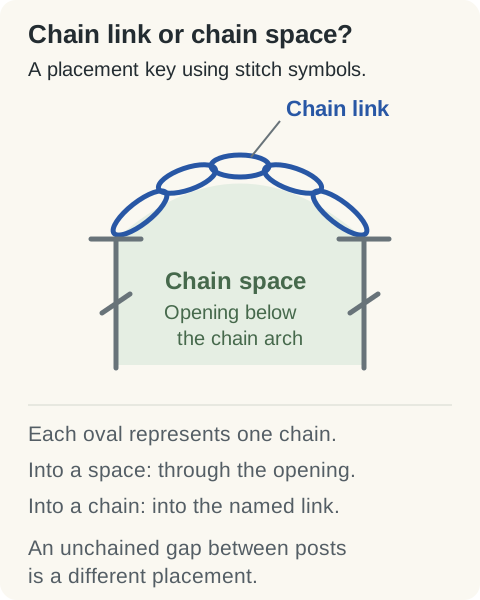
A chain space is the opening beneath an arch of chains, such as the corners of a granny square. Working into the space means inserting the hook through that opening, underneath the chain arch, rather than through an individual chain link.
An instruction to work into a particular chain is different. There, you need to find the link itself.
Likewise, a gap between two posts is not necessarily a chain space. Check what created the opening and what the instructions call it. The granny square lesson gives you a useful example of stitches worked into spaces.
 View diagram larger (opens in a new tab)
Check a short counted edge
On a row of ordinary single crochet, mark the first and last stitch tops. Trace each top V between them once. Compare that number with the row's written stitch count.
Keep the turning chain separate if the instructions say it does not count. A counted starting chain in a taller-stitch pattern may represent a stitch position, even though its structure looks different from the neighbouring posts.
If you cannot find a clear V, relax the fabric and follow a single post upwards to its top. A stitch marker through both top loops can help you see the correct position before inserting the hook.
Use the single crochet lesson to practise top-loop placement, then compare the longer posts in double crochet. Keep the glossary nearby for pattern-specific abbreviations.
Ready for your next little make?
Keep learning with this free lesson, or explore complete crochet project PDFs in the shop, with materials, measurements, construction photos and finishing guidance.
What to Make Next
Three logical next steps to continue practicing:
Single Crochet: The Foundation Stitch for Every Project
Practise finding and working beneath both top loops.
Double Crochet: Faster, Softer Fabric in US Terms
Compare taller stitch bodies and the top loops above them.
Classic Granny Square: The Step-by-Step Method
Find the chain spaces used between stitch groups and at corners.