

Reading Crochet Colour Grids: Cells, Direction and Counts
A coloured cell is only useful once you know what it represents. In one pattern it may stand for one single crochet; in another it may represent a corner-to-corner block or a filet mesh.

Copying the colours without that definition can produce a very different fabric. Keep the chart, legend and written notes together. This guide uses US terms and concentrates on reading a grid rather than teaching a complete colourwork method.
Define one cell before counting it
Find the instruction saying what one square means. Check whether the grid shows every worked row or uses another convention. In some mosaic systems, a chart row and a worked row are not interchangeable.
Also check whether edge stitches and turning chains are drawn inside the grid or added separately. Five coloured cells do not necessarily describe the entire width of a row with additional borders.
The chart-reading lesson distinguishes stitch symbols from accompanying instructions. A grid's colours do not tell you which yarn-over sequence or stitch height to use.
Identify the viewing face and starting corner
Read whether the chart shows the finished front, the working face of each row or another stated view. Locate the starting arrow and row numbers. Do not assume the lower-right corner is always the start.
For ordinary back-and-forth rows, your working direction changes after turning. A front-view grid usually needs a reading plan that accounts for that. An unturned round may keep one reading direction while requiring a separate marked start.
Handedness can change working direction too. Preserve the intended front-facing design by following its coordinates, rather than copying another hand's colour sequence without checking the picture. The left-handed pattern guide explains that distinction.
Read a small original example
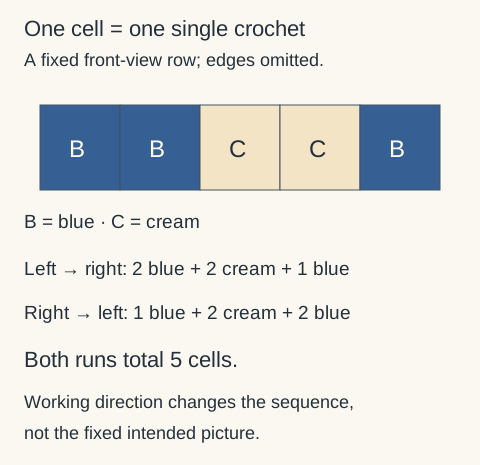
Suppose the legend says one cell equals one single crochet, and a five-cell row is shown from the intended front. Reading the printed row from left to right, its colours are:
Blue, blue, cream, cream, blue.
A left-to-right working pass follows two blue, two cream and one blue. A right-to-left working pass follows one blue, two cream and two blue. Both sequences account for five cells; the correct one depends on where your working pass begins in that front-view arrangement.
If the next row is shown from the same front view but you turn the fabric, recheck its reading direction. Do not assume a sequence copied for the first row remains the correct order for every row.
This isolates grid reading. Starting chains, boundary changes and tail handling still need complete stitch instructions. The single crochet lesson explains the ordinary stitch used in the example.
Translate groups into checked totals
Write down a row in manageable colour runs. Add those runs before starting: one blue plus two cream plus two blue equals five cells. Keep edge allowances separate so you can check the grid total and the complete row total independently.
If one cell is a block, count blocks rather than the individual stitches inside them. If a filet cell shares a boundary stitch with its neighbour, adding a full independent box of stitches for every cell can overcount the row. Use the pattern's mesh definition and edge calculation.
Check for repeat brackets. A small chart may show one repeat rather than the complete width. A repeated section plus a separately drawn edge is not the same as repeating the whole image to the end.
Keep your place through a colour change
Mark the row or diagonal you have completed, and identify the next cell. A ruler or movable guide should reveal the active line without hiding the legend or a needed adjacent row.
Before changing yarn, check the required transition for the chosen technique. A single crochet boundary, a joined block and an intarsia connection can use different movements. A colour grid does not define those movements on its own. Use the colour-change checks to inspect a late transition or loose boundary without changing the chart itself.
Leave ends accessible until the colour order and stitch total are checked. The finishing lesson provides related tail and edge context.
Investigate a reversed or shifted picture
Compare the intended front with the fabric's front, not the back. Then check the starting corner, turn direction, extra edge stitches and whether a repeat was offset.
A one-cell shift can remain hidden in a symmetric section and become obvious when a letter or off-centre shape appears. Work a small directional sample before a large picture panel, and record its starting face and reading order. That gives you a reliable reference for the rest of the chart.
Locking stitch markers
Openable markers help you find a stitch or the start of a round. A contrasting scrap of yarn works too.
Clover 3033 Quick Locking Stitch Marker SetView on AmazonYour next step
Keep making. Keep learning.
Separate working order from a fixed front view before adapting a chart.
Match reading direction to the intended picture