

Crochet Colour Changes: Fix Loose Loops, Gaps and Round Jogs
A colour change can look wrong for several reasons: the new colour starts a stitch late, a loose loop sits at the boundary, the unused strand shows through, or a stripe makes a step around a spiral. These need different fixes.

Start by identifying the mark you can see, rather than trying every joining trick at once. This guide uses US terms. It focuses on finding the cause; follow your pattern's specific instructions for its stitches, chart and joins.
A top loop is the old colour
For a conventional single crochet colour change, the new yarn completes the final pull-through of the stitch before the new-colour section. That puts the new colour on the hook ready for the next stitch. If you finish the preceding stitch entirely in the old colour, the loop carried into the next stitch will still be old-coloured.
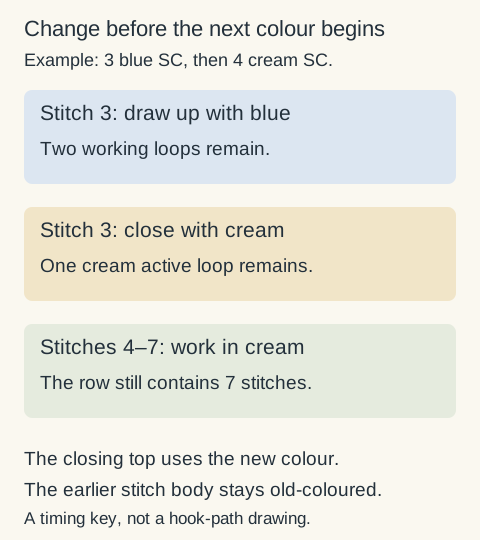
For example, suppose a row calls for three single crochet stitches in blue followed by four in cream. Work the first two blue stitches normally. On the third, draw up the loop with blue, then complete its final pull-through with cream. Work the next four stitches in cream. You still have seven stitches. The change does not create an extra stitch or erase the third blue stitch.
This describes the ordinary single crochet method. Special stitches can place their final closure elsewhere, so check the pattern's definition rather than transferring the timing blindly. The single crochet lesson helps you identify the stitch's stages; the double crochet lesson shows a stitch with more than one pull-through.
There is a hole or loose loop at the change
Inspect the nearby stitches before pulling either tail. Has a stitch been skipped? Did an unintended yarn-over create another loop? Is the starting chain being counted differently from the pattern's convention?
If the count and placement are correct, compare the size of the loops at the change with their neighbours. Hold the new working yarn under control while making the following stitches. Adjust a loose loop gently, without cinching the boundary into a knot or drawing the fabric sideways.
Keep enough tail to finish securely by a method suited to the fabric. A tightly pulled tail can make the front look neat temporarily while leaving the actual stitch distorted. Check the back as well as the front before continuing.
The unused colour peeks through
First check the construction method. A carried strand enclosed under stitches belongs to a different setup from separate yarn supplies used for blocks of intarsia. A pattern may ask you to carry, drop, cut or rejoin a colour. Those instructions are not interchangeable. The colourwork comparison separates the common yarn arrangements.
Where a strand is deliberately carried, check whether it lies in the intended position as each stitch is formed. Pulling it too tight can gather the fabric; leaving it very loose can expose loops. Spread the completed section to its relaxed width before assessing it.
The yarns also matter. A dark carried strand can be visible through a pale, open fabric even when you have followed the movements correctly. Compare a small sample in the intended colours before committing to a large panel. Changing the hook or yarn to hide a strand can change gauge, so check the gauge guide before applying that change to a sized project.
A stripe makes a step around the body
Check whether the piece uses continuous spirals or joined rounds. A spiral keeps climbing rather than finishing each round at a level join. A colour boundary can therefore show a step where the stripe returns to its starting area.
That step does not necessarily mean you missed a stitch. Mark the first stitch and count the round. The rows, joined rounds and spirals guide separates those constructions. Compare the actual pattern with the amigurumi basics lesson before adding a slip stitch or turning the work.
Methods sometimes called jogless joins alter particular stitches or transitions. They are not universal instructions to insert anywhere. Adding a join to a pattern written in spirals can change the count or leave another visible mark. Use a method written for your stitch and construction, and test it in a practice piece first.
The colour boundary leans
Single crochet stitches do not necessarily stack as perfectly square pixels. A chart's neat grid can make the slope in actual fabric more noticeable, especially across a tall block of colour.
Check the chart's reading direction and whether the work turns. A flat piece worked back and forth and a spiral worked continuously do not follow the same directional routine. Look for arrows, row numbers and a written instruction defining what one cell represents.
If the count is right but the line leans, do not move the colour boundary by a stitch on every row just to straighten the drawing. That changes the design. Test the pattern's specified stitch method and view the actual sample before choosing any adjustment.
A short check before you unravel
- Identify the construction: rows, joined rounds or a continuous spiral.
- Count the affected row or round and locate its first stitch.
- Find the final pull-through before the new-colour section.
- Check the loose ends and unused strand on the back.
- Compare the fabric relaxed, not pulled tight to hide the mark.
Then fix the smallest confirmed cause. If it is a late change, undo to the preceding stitch. If it is a spiral step, check the join method. If it is a carried strand showing, test the fabric and colours. A clear diagnosis is more useful than a promise that every colour change can become completely invisible.
Locking stitch markers
Openable markers help you find a stitch or the start of a round. A contrasting scrap of yarn works too.
Clover 3033 Quick Locking Stitch Marker SetView on AmazonYour next step
Keep making. Keep learning.
A spiral step and a missed stitch need different checks.
Check the construction before changing the join