

Mosaic, Tapestry or Intarsia: Choose a Crochet Colourwork Method
Three samples can show blocks of colour while hiding very different yarn paths. Before choosing a method, look at how many colours are worked within a row, where unused yarn travels and what the back of the fabric needs to look like. This guide compares common constructions using US terms.

Each pattern still needs its own chart key and special-stitch definitions.
Tapestry: check the carried yarn
In a common tapestry method, the unused colour lies along the working row and the new stitches enclose it. You change which colour is active as the design requires.
That can keep both supplies available across a row, but the carried yarn becomes part of the fabric. It can affect thickness, tension and how a contrasting strand shows through. Do not assume the reverse will look exactly like the front.
Spread the completed stitches to their relaxed width when assessing the carried strand. Pulling it tight can gather a section even when the stitch count remains correct. A loose strand can leave unintended loops.
The single crochet lesson explains the basic stitch often used in tapestry work. The colourwork pattern must define its precise wrapping and colour-change method.
Intarsia: check the separate colour areas
Intarsia commonly uses a separate supply for each distinct colour area instead of enclosing an unused strand across the entire width. The boundary needs a defined yarn connection to avoid an open gap.
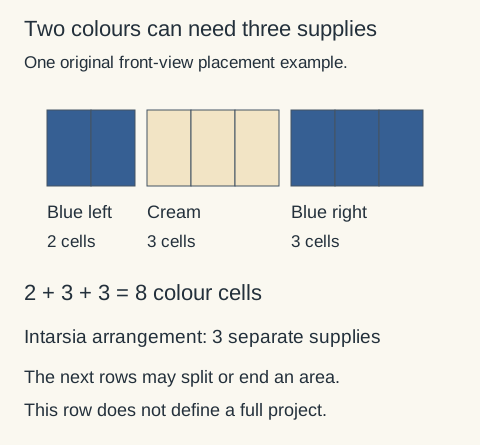
Consider an original eight-cell reading example: two blue cells, three cream cells, then three blue cells. In a simple separate-area arrangement, you could use one blue supply on the first side, one cream supply in the middle and another blue supply on the second side. That is three supplies despite only two colours.
The following rows determine whether those areas continue, split or end. One row cannot establish the total number of bobbins needed for a complete picture.
Do not replace the joining instruction with an arbitrary tight knot at every boundary. Check the yarn path on both faces and keep the supplies manageable when turning.
Mosaic: check how the chart becomes stitches
Mosaic crochet includes different systems. Some use one active colour along a worked row and reach into lower rows to create the visible pattern. Others use different chain, row or turning arrangements.
A coloured cell therefore may describe the resulting design rather than a direct instruction to change yarn at that cell in the current row. You need the system's key to know when to work a short stitch, a longer stitch, a chain or a specified loop.
Check whether a longer stitch replaces a position at the current edge and whether the top behind it is skipped. Working both without instruction can add an accidental stitch. The double crochet lesson helps with stitch formation, but it does not define every mosaic placement.
Do not transfer an overlay chart's rules to another mosaic method just because the finished pictures look similar.
Choose from the design and fabric requirements
For small repeated colour changes, compare how a carried-yarn sample handles the inactive strand. For larger distinct picture areas, compare a separate-supply sample and the number of boundaries it creates. For a geometric pattern designed around a particular mosaic system, learn that system before substituting a direct colour-change technique.
These are useful starting questions, not rules saying one method is always best for a particular object. Check the desired reverse, fabric thickness, stretch, yarn management and the pattern's intended use.
If you want lettering or a directional picture, confirm the reading face and working direction in a small asymmetric sample. A symmetric practice strip can conceal a reversed reading plan. The chart-reading lesson explains how the legend and starting point contribute to that check. For colour cells, the colour-grid guide shows how one fixed picture can have different working sequences.
Compare samples on equal terms
Use the intended yarn and colours, label the method and inspect both sides. Measure after the same suitable finishing process, then compare drape, thickness, visible strands and boundary gaps.
Record actual yarn use by colour if you are estimating a project. Equal chart areas do not establish equal consumption across methods because the yarn paths differ.
The gauge guide helps you record those measurements. Choose the construction from a checked fabric and a clear yarn plan, rather than treating every coloured grid as interchangeable.
Your next step
Keep making. Keep learning.
A finished-colour grid and a stitch-operation chart need their own reading keys.
Define what a colour cell means