

How to Read a Corner-to-Corner Crochet Chart
A corner-to-corner colour chart looks like a grid, but the worked rows travel across its diagonals. Reading one printed horizontal line as one crochet row can scramble the picture even if every block is formed correctly. This guide explains how to map cells, diagonals and edges.

It assumes you are using a pattern that defines its C2C block, increase and decrease movements. US terminology is used here.
Check what makes one block
Many C2C patterns build a block with chains and a group of double crochets. Other versions change the stitch height or chain count. Use the pattern's definition rather than assuming all C2C blocks are identical.
One chart cell represents the defined block, not one of its individual double crochets. The colour-grid guide explains why the cell definition must come before the count. The double crochet lesson explains that stitch, while the chart-reading lesson helps separate symbols and grid units.
The chart also needs a start corner, a direction for the first diagonal and a stated viewing face. Read those notes before choosing where to place your first block.
Follow diagonals in working order
Begin at the chart's marked starting corner. Trace the first cell, then the next diagonal according to the arrows. Because ordinary C2C rows turn, the direction along successive diagonals alternates.
Mark the diagonal number separately from a printed horizontal row number. If the chart has both kinds of reference, label your notes so that “row four” cannot mean two different things.
Keep the completed fabric beside the chart in the declared orientation. Turning the fabric to work the next row does not mean rotating the chart's intended finished picture each time.
Count an original small rectangle
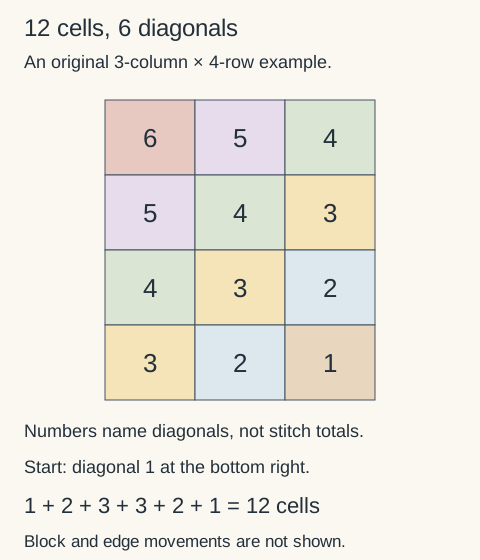
For a three-column by four-row rectangular grid, there are twelve cells. Traversing it along diagonals from one corner gives six diagonals with these cell counts:
1, 2, 3, 3, 2, 1.
Their sum is twelve, matching the number of cells. There are six worked diagonals in this reading exercise, not four simply because the printed grid has four horizontal rows.
This is chart arithmetic only, not a complete miniature blanket pattern. The block and edge movements still need to be defined and checked in the actual fabric.
Decide what each edge needs
Early diagonals grow while both side dimensions are being established. A rectangular layout then reaches one side's limit before the other. During the middle phase, one edge can require a straight/decreasing treatment while the other still grows. Later both dimensions are complete and the diagonals shorten.
A repeated diagonal total does not by itself tell you which end to change. Mark the physical edge that has reached its required dimension. Follow the start and finish instructions separately for each row.
When a diagonal shortens, check both ends. A beginning slip-stitch movement does not automatically explain how the last block or joining space is handled at the far edge. Missing that finishing instruction can add a block beyond the intended boundary.
Read colour runs as blocks
Within the active diagonal, group consecutive cells of the same colour and add the groups. Two blue blocks and one cream block mean three blocks, not three individual double crochets.
Use the pattern's colour-change method. The transition between blocks may use a different point from an ordinary single crochet colour change. Leave the yarn ends accessible while checking the first few changes.
Plan separate supplies where the design calls for them, and check whether carrying a strand would leave it exposed through gaps. Turn the work in a controlled way so the supplies do not become a tight bundle behind the fabric.
Check orientation before a large picture
An asymmetric mark in a small sample reveals a mirrored reading plan more clearly than a solid-colour square. Confirm the start corner, reading direction and intended front before beginning lettering or a directional image.
Measure completed blocks after the care-compatible treatment planned for the project. A nominally square chart cell does not prove that your worked block has equal width and height. The gauge guide explains measured comparison, and the care lesson helps with finishing.
Keep the diagonal totals and edge instructions beside the chart. Together they give you a way to check both the picture and the outline, instead of discovering at the last corner that one boundary grew too far.
Locking stitch markers
Openable markers help you find a stitch or the start of a round. A contrasting scrap of yarn works too.
Clover 3033 Quick Locking Stitch Marker SetView on AmazonYour next step
Keep making. Keep learning.
A chart cell can represent a block rather than one individual crochet stitch.
Check the cell definition and reading face