

Planning Colour Changes in Crochet Rows
Choosing two colours is only the start of a striped project. The row sequence also decides where you change yarn, which edge the unused strand is waiting at and how many ends you will need to finish. Make a short row plan before starting.

It is easier to change a few written numbers than to discover halfway through a panel that the colour you need is waiting at the opposite edge. This guide uses US terms and focuses on planning colour changes in a flat piece worked back and forth. A spiral or joined-round project needs its own plan.
Write down the rows, not just the stripe names
For a twelve-row practice panel with four equal bands, you could choose:
- Rows 1 to 3: blue.
- Rows 4 to 6: cream.
- Rows 7 to 9: blue.
- Rows 10 to 12: cream.
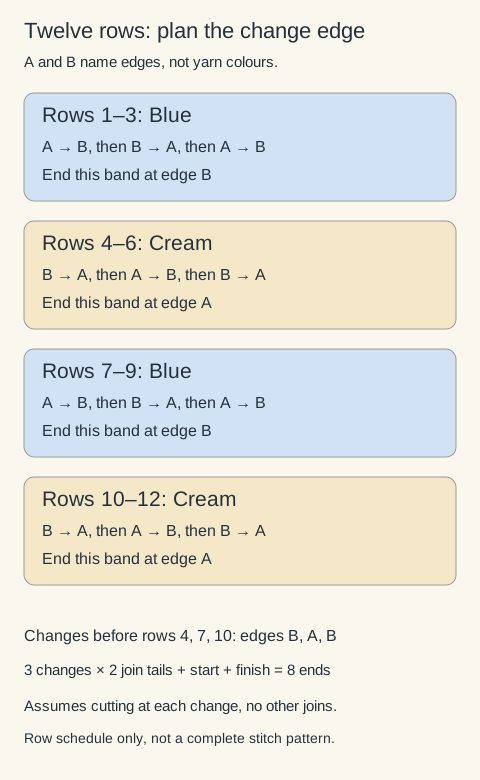
Each band has three rows, so the total is 3 + 3 + 3 + 3 = 12. There are three colour boundaries: before rows 4, 7 and 10. This is a planning example, not a complete pattern with a starting chain or finished dimensions.
Include any setup row in the plan. If the pattern has a foundation row followed by numbered pattern rows, decide whether your first band includes that foundation before counting off three rows.
The stitch counter can record the completed row. A paper tally works too. Use the same convention throughout: a row is complete when you have worked all its required stitches, not when you have made the next turning chain.
Decide which edge each change will use
Label the two edges A and B. If row 1 starts at A, it finishes at B. Row 2 returns to A, and row 3 finishes at B. In the example above, the first change is therefore at B, the second at A and the third at B.
That matters if you want to keep an unused yarn attached at an edge. After the first blue band, blue is left at B. After the next three cream rows, you need blue at A. It has not moved there by itself.
Cutting and rejoining is one option. Changing the stripe sequence may be another if the project is your own design. Drawing the unused yarn across the back would create a different construction and a strand that needs its own handling plan. Do not call that an edge carry.
With an even number of ordinary back-and-forth rows, you return to the same edge. That can make some stripe sequences easier to carry, but you still need to check where each particular colour is waiting. An even row count alone does not guarantee a tidy edge.
Read the turning-chain convention before changing colours
Your pattern should say whether its turning chain counts as a stitch. Keep that convention when the yarn changes. A new colour does not justify adding a second turning chain, skipping another base or working an extra stitch into the edge.
The turning-chain guide compares counted and uncounted starts. Check that rule separately from the row colour so that a stripe boundary does not become an accidental increase or decrease.
For an ordinary row-boundary change, the new yarn commonly completes the final pull-through of the preceding stitch, leaving the new active loop ready for the next row. Check the exact stitch definition and the pattern's directions.
Review the single crochet lesson or double crochet lesson if you need to locate that final closure. These stitches have different working stages. Do not use one fixed number of loops as the rule for every stitch.
Choose whether to cut or carry
Cutting at each boundary gives you separate tails to finish, but avoids taking an unused strand up an edge. Leave enough yarn to secure those ends later.
Carrying can reduce the number of cut ends where the unused colour is available at the correct edge. Check that the strand allows the full row height without tightening the side. A loose carry can catch; a tight one can gather the edge. A border may cover a carry visually, but it does not automatically correct its tension.
For the twelve-row example, cutting at all three boundaries creates six join tails: an old and new tail at each change. Add the initial starting tail and the final fastening-off tail for eight ends altogether. That count assumes no other joins, no carried sections and no additional pieces.
Use that calculation to plan finishing time, not to decide that cutting is always wrong. Fewer ends are only helpful if the resulting fabric and edge are suitable.
Estimate yarn by the fabric, not the colour count
Two colours do not necessarily mean equal quantities. In the example, each colour occupies six rows, but equal row counts only suggest similar consumption if the stitch pattern, width and working conditions remain comparable.
A textured band, shaping section or different yarn can change the amount used. Make a representative sample and record consumption by colour if the supply is limited. Include the joining tails and any border separately.
Check dye lots and the actual colours beside each other before beginning. A photograph or screen swatch cannot show exactly how the yarns will look together in your light.
Review a small section before repeating it
After the first changes, inspect both faces and both edges. Count the stitches, confirm the row numbers and check that the unused yarn is where the plan says it should be.
Keep the tails accessible until those checks are complete. Use the finishing lesson for related end and edge techniques. Once the sequence works in your sample, you have a plan you can repeat instead of making a new decision at every stripe.
Locking stitch markers
Openable markers help you find a stitch or the start of a round. A contrasting scrap of yarn works too.
Clover 3033 Quick Locking Stitch Marker SetView on AmazonYour next step
Keep making. Keep learning.
Use the row and edge schedule to distinguish a planned colour boundary from a same-colour supply change.
Choose where the new strand joins