


Mosaic Crochet: Read the Method and Make a Twelve-Stitch Sample
By The Slow Stitch · Terminology: US Crochet Terms · Reading time: 9 min read · theslowstitch.com
A mosaic square can describe a colour, a stitch operation or a pair of rows. Before putting the hook into the fabric, find out which meaning your chart uses. A familiar-looking grid is not enough to identify the method.
This lesson compares inset and overlay mosaic, then works a small overlay exercise in US terminology. Single crochet is UK double crochet; double crochet is UK treble. You will use one colour per row, leave front loops available for later stitches and keep twelve positions across the fabric. The sample is a placement exercise rather than a blanket pattern.
Be comfortable with single crochet, double crochet and the difference between the two strands of a top V. The symbol-chart lesson explains why the legend controls how a mark is read.
What You'll Learn
By the end of this tutorial you will be able to:
- Distinguish inset and overlay mosaic
- Reach the specified front loop two rows below
- Leave the immediate base behind each longer stitch unused
- Keep twelve stitch tops in every row
What You Need
Smooth yarn suited to the exercise; choose compatible contrasting colours where requested
A comfortable hook suited to your practice yarn
Locking markers or contrasting yarn scraps, Scissors, Blunt yarn needle
Use the materials above for practice, adjusting the hook if needed for comfortable stitches. For a finished project, follow its pattern’s yarn, gauge and care requirements.
Abbreviations
| Abbr | Full Term |
|---|---|
| ch | chain |
| sc | single crochet (US; UK double crochet) |
| dc | double crochet (US; UK treble) |
| BLO | back loop only |
| FLO | front loop only |
Identify inset or overlay before starting
In the overlay version used here, each row is worked from the same edge with the display face towards you. Change colour after every row. Short background stitches enter back loops; selected longer stitches reach into exposed front loops two rows lower. The old top immediately behind each longer stitch is left unused.
Inset mosaic commonly works a forward and return row in each colour. Planned chain spaces leave room for later stitches, and a chart line may represent that pair rather than one physical row. The return row and the later insertion point need their own instructions. Do not take the two-rows-lower rule from this overlay sample and apply it automatically to inset work.
These are method distinctions, not a promise that every design follows one universal chart convention. Read the colour key, edge instructions, stitch definitions, row numbers and any exceptions. Interlocking crochet and carrying a second colour inside every stitch are different constructions.
Gather two contrasting yarns
Choose two smooth yarns of similar thickness and compatible care requirements. Call them A and B; A does not have to be the lighter shade. Use a suitable hook, two removable markers, scissors and a blunt yarn needle. Existing supplies are enough for this exercise.
Try the colours beside each other in ordinary light. If they are hard to distinguish, the long stitches will also be harder to follow. Texture and contrast matter more here than using a particular fibre or hook size. No finished dimensions or yarn quantity are specified.
Every row below contains twelve stitch tops. The first and last are ordinary single crochets worked through both top loops. Interior single crochets use the back loop only, abbreviated BLO. Keep the edge markers in actual stitch tops, not in a joining loop or chain.
Establish twelve positions in colour A
With A, chain thirteen. Single crochet in the second chain from the hook and each remaining chain: twelve single crochets in row one. The skipped chain and active hook loop are not extra stitches.
Fasten off, leaving enough tail to weave securely through this yarn. Mark the face towards you as the display face. Do not turn the piece for the following rows.
Number positions one to twelve in the order you worked them. For right-handed work, position one is at the right edge of this face; for left-handed work it is at the left. Keep those columns fixed throughout the exercise. Every new row begins above position one and ends above position twelve.
Join B and leave the lower front loops free
Return to position one without turning the fabric. With B, draw a loop through both top loops of the first stitch, leaving a tail for securing. Chain one; this attachment chain does not count as a stitch. Single crochet into that same first stitch to make the first actual top of row two.
Work one BLO single crochet into each of positions two to eleven. Finish with an ordinary single crochet through both loops of position twelve. Count twelve tops, then fasten off with a useful tail.
The interior front loops of row one remain unused on the display face. They are the lower anchors for row three. The attachment chain, tails and exposed loops do not enlarge the row count.
Use this same joining procedure at the beginning of rows three, four and five: attach at position one, make the uncounted chain and work the first ordinary single crochet in that same base. Do not join at the previous row's finishing edge.
Make one mosaic double crochet
Row three uses A. After its first edge stitch, work a BLO single crochet at position two. The next position is three.
- Yarn over once. Find the unused front loop at position three in row one, two rows below the row being made.
- Insert from below that single strand and out above it, keeping the hook on the display face. Leave the old post, back loop and row-two top behind it alone.
- Catch the yarn and draw up a loop to the current working height. Three loops are on the hook.
- Yarn over and pull through two loops twice. One active loop remains. This is one mosaic double crochet, shortened here to MDC.
Leave position three of row two unworked behind the new MDC. Its place in row three has already been filled. Resume at position four. Working a background single crochet into position three as well would create an extra top.
Let the longer stitch lie across the intervening row without dragging the fabric upwards or leaving a loose strand. A lower insertion point needs enough yarn to reach the working edge; pulling the loop tight is not a substitute for controlling that length.
Complete rows three to five
The following position lists include the first and last ordinary edge stitches. All other positions not listed as MDC are BLO single crochets.
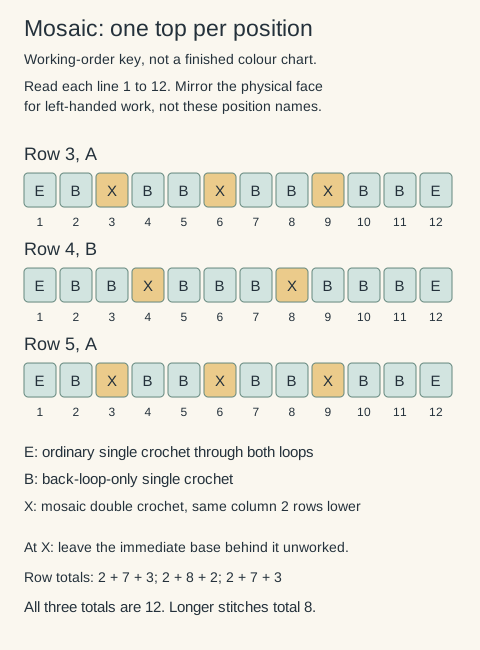
- Row three, A: ordinary single crochet at one; MDC at three, six and nine, each into the same-numbered front loop of row one; ordinary single crochet at twelve. Work BLO single crochet at the seven remaining interior positions. Total: two edges, seven interior single crochets and three MDC, giving twelve tops.
- Row four, B: ordinary edges at one and twelve; MDC at four and eight into the same-numbered front loops of row two. The other eight interior positions are BLO single crochets. Total: two plus eight plus two, giving twelve tops.
- Row five, A: ordinary edges at one and twelve; MDC at three, six and nine into the same-numbered front loops of row three. The other seven interior positions are BLO single crochets. Total: two plus seven plus three, giving twelve tops.
At every MDC, leave its immediate base in the previous row unused. Advance by one current position, even though the hook reaches farther down for its anchor. Fasten off after each row and return to the starting edge without turning.
The row-three front loops used in row five include tops of earlier MDC stitches. They remain available because row four either used their back loops or left their tops unused. Inspect the actual strand before inserting the hook; do not rely only on its colour.
Read the exercise as operations, not a finished picture
For this exercise only, imagine a grid with twelve columns and one line per physical row. An X means MDC into the same column two rows below. A plain interior cell means BLO single crochet; the two edge cells mean ordinary single crochet. The row label supplies the working colour.
Rows one and two are setup rows. Row three has X at three, six and nine; row four has X at four and eight; row five repeats the row-three X positions. These marks describe what to do at the current edge. A longer stitch covers part of the row beneath it, so the visible surface is not a simple picture of five horizontal colour stripes.
A different chart may show the intended finished colours and require an additional symbol to identify the longer stitches. An X may mean something else entirely. Write a short note beside the legend before starting a new project: what a cell means, how many rows it represents and where its long stitch enters.
 View diagram larger (opens in a new tab)
Find a mistake before adding another row
Thirteen tops usually means one MDC was followed by a single crochet in the base it should replace, or an attachment chain was treated as an extra position. Eleven tops can mean a base was skipped without making its replacement. Count the actual top Vs, as described in the stitch-counting guide.
If the expected lower front loop is missing, check the row number and whether an earlier single crochet caught both loops. Do not split a strand or force the hook into the post to make the chart appear to fit. Undo the affected work while you can still identify the path.
If a long stitch pulls the sample out of shape, check its anchor and the drawn-up loop height. If it hangs loose, check for excess length. Neither problem is reliably repaired by stretching the whole sample during finishing.
Secure the row ends and compare both faces
After row five, inspect the twelve tops, the three long stitches on that row and the eight MDC placements across rows three to five altogether. Secure each starting and finishing tail using a method appropriate to the yarn. The finishing lesson covers weaving without distorting the fabric.
This small sample has five separately started rows. It deliberately gives practice with the ends rather than hiding them in a border. A larger design may specify fringe, an enclosed edge or another finish; follow its construction instead of assuming loose tails are automatically secure.
Turn the sample over only for inspection once the rows are complete. The reverse does not repeat the same overlaid picture. Compare the faces with the fabric relaxed, and follow the care instructions for both yarns. The next useful step is a complete chart with its own repeat, edge and finishing rules, not enlarging these five placement rows into an assumed blanket repeat.
Ready for your next little make?
Keep learning with this free lesson, or explore complete crochet project PDFs in the shop, with materials, measurements, construction photos and finishing guidance.
What to Make Next
Three logical next steps to continue practicing:
How to Read a Crochet Chart: Visual Symbols Explained
Continue with the related stitch, chart or finishing method.
Front Loop Only and Back Loop Only Crochet
Continue with the related stitch, chart or finishing method.
Double Crochet: Faster, Softer Fabric in US Terms
Continue with the related stitch, chart or finishing method.