


Intarsia Crochet: Join Separate Colour Areas in Turned Rows
By The Slow Stitch · Terminology: US Crochet Terms · Reading time: 9 min read · theslowstitch.com
Intarsia keeps a yarn supply beside each area that needs it. A colour used on both sides of a contrasting block therefore needs two separate supplies. It does not travel across the middle simply because the two outside areas share a colour name.
This lesson makes a fourteen-stitch, six-row sample in US single crochet (UK double crochet). Four colourwork rows contain a small B rectangle between two A areas. You will practise a boundary in each working direction while keeping the inactive supplies on one chosen reverse face.
Begin with the single-crochet lesson. Work under both top loops throughout. This sample does not include shaping, increases, decreases or an unturned circular construction.
What You'll Learn
By the end of this tutorial you will be able to:
- Read fixed colour positions in both row directions
- Keep three separate supplies beside their colour areas
- Change colour on the preceding stitch’s final pull-through
- Keep fourteen stitches while checking both fabric faces
What You Need
Two smooth, contrasting yarns of compatible thickness; divide A into two separate supplies
A comfortable crochet hook suited to the chosen yarn
Removable markers or contrasting yarn scraps, Scissors, Blunt yarn needle
Use the materials above for practice, adjusting the hook if needed for comfortable stitches. For a finished project, follow its pattern’s yarn, gauge and care requirements.
Abbreviations
| Abbr | Full Term |
|---|---|
| sc | single crochet (US; UK double crochet) |
| ch | chain |
Prepare three supplies for two colours
Choose compatible smooth yarns A and B, a suitable hook, scissors, a blunt yarn needle and removable markers. Divide A into two manageable supplies. Keep one B supply. Small balls are enough; bobbins are optional rather than a requirement.
View the intended display face and call the A supply for its left area A-left, and the one for its right area A-right. B serves the middle. The names refer to the displayed areas, not whichever side is nearest your hook after turning.
Keep the three supplies separated on the work surface. Do not wind yarn tightly around your fingers to make a bobbin. Leave enough free working length that the next stitch does not pull a supply against the fabric.
There are three colour areas but only two colours. Joining both A areas to one strand across B would require a carry or float and would change this exercise's construction.
Make two setup rows and mark the display face
For right-handed crochet, start with A-right. For left-handed crochet, start with A-left. That initial supply will continue into the outer area at your row-three starting edge.
Chain fifteen. Single crochet into the second chain from the hook and each remaining chain: fourteen stitches in row one. Mark the face towards you as the display face. Chain one, turn and work fourteen single crochets for row two.
Every turning chain in this sample is uncounted. Make the first actual stitch into the first base, mark the outer tops and keep fourteen positions across. Leave the starting A supply attached after row two.
The other A supply and B are introduced during row three. They are not carried through the setup rows.
Read the fixed colour columns
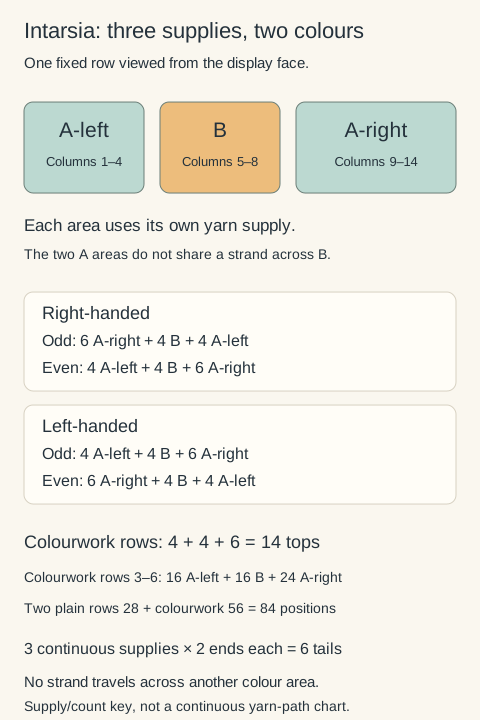
Looking at the display face, number the columns one to fourteen from left to right. In rows three, four, five and six, columns one to four use A-left, five to eight use B, and nine to fourteen use A-right.
One chart cell represents one single crochet begun in its named colour. The final pull-through of the preceding stitch prepares the next working loop; it does not add a new cell.
Right-handed display-facing rows three and five run from column fourteen to one: six A-right, four B, four A-left. Reverse-facing rows four and six run from one to fourteen: four A-left, four B, six A-right.
Left-handed display-facing rows run from one to fourteen, with four A-left, four B, six A-right. Their reverse-facing rows run from fourteen to one, with six A-right, four B, four A-left.
The unequal outer widths make the reading direction visible. Do not start both faces with the same run merely because it was correct on the previous row. Each colourwork row still has ten A stitches and four B stitches, fourteen in all.
 View diagram larger (opens in a new tab)
Introduce B at the first boundary
Chain one and turn for row three. The display face is towards you. Work the first A run using the supply already attached: six stitches for right-handed work or four for left-handed work.
- On the last stitch of the A run, draw up a loop with A and stop. Two A loops remain on the hook.
- Leave A towards the reverse, away from you on this display-facing row. Bring the new B working strand beneath A at the boundary, leaving a tail long enough to secure later.
- Yarn over with B and draw it through both hook loops. One B loop remains. The crossing connects the neighbouring colour areas; it is not a knot tied in the yarn ends.
The stitch just completed occupies the final A cell. Begin the next base with B. Do not make a chain between the two colours or repeat a stitch in the boundary base.
For the next B stitch, keep the inactive A supply hanging locally on the reverse. Do not lay it along the row to enclose it in the B stitches. Its next use will be beside this boundary on the return row.
Introduce the second A supply
Work four B stitches. On the fourth, draw up the loop with B and stop with two loops on the hook. Drop B towards the reverse, then bring the other A working strand beneath B and use it for the final pull-through.
This is A-left for right-handed row three and A-right for left-handed row three. It is a new supply, not the A strand parked on the far side of the B block.
Finish the remaining outer A area. Count fourteen tops across the row. Three supplies are now attached, each beside the area it serves. The two starting tails introduced at the boundaries stay accessible for later finishing.
Let the fabric relax before tightening a boundary loop. Pulling either supply hard can shrink the stitch next to the change or draw the two areas together unevenly.
Return across the reverse-facing row
Chain one with the colour at the working edge and turn for row four. The reverse now faces you. Keep all unused supplies on this near side while you work; moving them to the far side would put them on the chosen display face.
Work the first outer area in the appropriate reading direction. On its last single crochet, draw up a loop with the current colour. Leave that strand on the near, reverse side. Bring the next supply beneath it at the boundary and complete the final pull-through with the next colour.
Make the four middle B stitches. At the fourth, repeat the same boundary handover to the other A supply, which is waiting beside its own area. Complete the final A run. Count fourteen tops and inspect both boundaries from the display face.
The inactive supplies do not pass beneath the stitches of the other areas. Each local connection crosses only at its boundary. If a strand runs all the way across the B block, check whether you picked up the wrong A supply.
Repeat the two directions through row six
Row five repeats row three's displayed placements, using the supplies already attached. Row six repeats row four. Chain one and turn once before each row; keep that chain outside the count.
Check fourteen tops on every row: four A-left, four B and six A-right across the display face. The arrangement stays fixed, even though you approach it from opposite ends.
Two boundaries per colourwork row give eight handovers. They do not mean cutting and rejoining at every handover. With the three continuous supplies specified here and no extra joins, there are three starting tails and three finishing tails, six ends to secure altogether.
The supplies can twist around each other as the work turns. Pause and untangle the small balls without pulling them through tight stitches. You can turn the work back the other way at the next row end to manage the supply twist; this does not change which face or row direction is next.
Diagnose a gap or an unwanted strand
A vertical opening at a colour boundary can come from a missing connection or an overly loose working loop. Trace where the new yarn passes beneath the old yarn and compare the neighbouring stitch sizes. Do not close the gap by adding an extra stitch.
A thick cord running along the boundary can mean the yarns were repeatedly wound around each other beyond the single handover. A long horizontal strand can mean one A supply was pulled across the middle instead of using the A supply waiting at that side.
If the reverse has loose local loops, adjust the latest change gently while its path is visible. If the display face has a tail or parked yarn, check its placement before the last turn. Undo the affected section rather than dragging the strand through the fabric to hide it.
The counting guide helps distinguish structural tops from yarn crossing behind them. Fourteen tops can still hide an incorrect boundary, so examine the connections as well as the total.
Finish locally and compare constructions
After row six, fasten off the active edge yarn. Cut the other supplies with enough length to secure them. Weave all six tails into suitable nearby fabric on the reverse, using the finishing lesson. Do not leave a long thread bridge between the two separate A areas.
Follow the care lesson for both yarns. Measure only after the intended care-compatible process. This exercise establishes its own counts, not a standard finished size or a promise that every colour boundary will become invisible.
Intarsia and tapestry can place the same coloured block using different yarn routes. In the tapestry construction, the unused yarn travels inside the stitches; here it waits locally at an area boundary. If a later design shifts that boundary, adds another area or works in rounds, check how each required supply will reach its next position rather than extending this fixed-block schedule unchanged.
Ready for your next little make?
Keep learning with this free lesson, or explore complete crochet project PDFs in the shop, with materials, measurements, construction photos and finishing guidance.
What to Make Next
Three logical next steps to continue practicing:
Tapestry Crochet: Carry Two Colours Through a Small Sample
Compare yarn enclosed inside the stitches.
Single Crochet: The Foundation Stitch for Every Project
Review the stitch used throughout this exercise.
How to Join a New Ball of Yarn in Single Crochet
Practise the final pull-through with new yarn.