

How to Increase in Single Crochet
By The Slow Stitch · Terminology: US Crochet Terms · Reading time: 4 min read · theslowstitch.com
A single crochet increase puts two stitches into one stitch from the previous row or round. You use one base stitch and create two new tops, adding one to the total stitch count.
This lesson uses US terminology. US single crochet, abbreviated sc, is UK double crochet. An instruction may say inc, 2 sc in next st, or define a different increase in its special-stitch notes. Read that definition before starting.
What You'll Learn
By the end of this tutorial you will be able to:
- Work two complete single crochets under the same old top V
- Identify two new tops above one shared base
- Keep the turning chain outside the stitch count
- Turn eight base positions into nine new stitches
What You Need
Smooth, visible yarn for a small two-row practice piece; teaching close-ups use separate demonstration fabric
A hook suited to the yarn with comfortable space on its shaft
A removable marker or contrasting yarn scrap for each edge, Scissors and a blunt yarn needle
Use the materials above for practice, adjusting the hook if needed for comfortable stitches. For a finished project, follow its pattern’s yarn, gauge and care requirements.
Abbreviations
| Abbr | Full Term |
|---|---|
| sc | single crochet (US) |
| ch | chain |
| st | stitch |
| inc | increase, as defined by the pattern |
Begin with a counted row
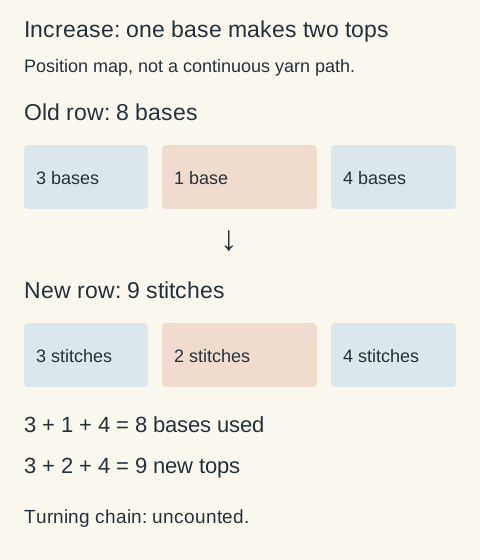
The close-up isolates a completed increase in separate demonstration fabric. Use the count key for the full eight-to-nine-stitch exercise; the cropped image is not a photograph of that complete row.
For this practice exercise, make a foundation chain of nine chains. Work one single crochet into the second chain from the hook, then one into each remaining chain. You should have eight single crochet stitches.
The skipped chain does not count as a stitch in this exercise. The next row begins with one turning chain, which also does not count.
If you need help making that first row, follow the movements in the single crochet lesson. Mark the first and last stitch tops so that you can recognise the edges after turning.
Work the increase
Chain one and turn. Work one single crochet into each of the first three stitches. The fourth stitch is where you will increase.
- Insert the hook under both top loops of the fourth stitch.
- Yarn over and draw up a loop. Two working loops are now on the hook.
- Yarn over and draw through both loops. You have made the first single crochet into that base stitch.
- Insert the hook under the same two base loops again. Do not move to the next V.
- Make another complete single crochet there.
There are now two new stitches sharing the fourth base stitch. Move on and work one single crochet into each of the remaining four base stitches.
The practice row is:
Ch 1, turn. Sc in each of the next 3 sts, 2 sc in the next st, sc in each of the next 4 sts. (9 sc)

Check what changed
You used three base stitches before the increase, one for the increase and four after it. That accounts for all eight stitches in the old row.
The new row has three ordinary stitches, two stitches at the increase and four more ordinary stitches: 3 + 2 + 4 = 9.
Look above the increased position. You should be able to identify two separate top Vs, even though they emerge from the same base. On a following plain row, each would normally receive its own stitch.
 View diagram larger (opens in a new tab)
Avoid the common mix-ups
Two stitches into two neighbouring bases is not an increase. It uses two and produces two, so the total stays the same. Both new stitches must share the specified base for this particular increase.
This increase finishes each new stitch separately. Each single crochet here is completed, leaving one active loop before you begin the next. Closing partially made stitches together across different bases can make a decrease; closing them together in one base can make a cluster. Neither is the two-complete-stitches increase used here.
Do not add the turning chain to this count. If you get ten, check whether you counted it or worked into it at the far edge. If you get eight, check whether you made the second stitch in the increase.
Use the technique in a pattern
Increase placement controls shape. A pattern might put increases at the edges, at fixed points in a round or in a more scattered arrangement. Follow that placement rather than adding an increase whenever the fabric looks narrow.
This one-row exercise demonstrates the movement and arithmetic. It does not establish a universal flat-circle formula or a finished size. Yarn, hook, stitch height and the full sequence of rounds all affect the result.
When you are comfortable identifying the two new tops, explore amigurumi construction. Use the stitch counter to record completed rows or rounds, and still check the stitches in the fabric yourself.
Ready for your next little make?
Keep learning with this free lesson, or explore complete crochet project PDFs in the shop, with materials, measurements, construction photos and finishing guidance.
What to Make Next
Three logical next steps to continue practicing:
Single Crochet Decrease: How to Work Sc2tog
Compare two bases producing one top with one base producing two.
Single Crochet: The Foundation Stitch for Every Project
Rehearse the complete single-crochet movement.
Amigurumi Basics: Spirals, Shaping and a Practice Piece
Use a complete sequence of shaping rounds.