


Crochet Plaid: Add Surface Lines to a Striped Swatch
By The Slow Stitch · Terminology: US Crochet Terms · Reading time: 8 min read · theslowstitch.com
Crochet plaid can be made in several ways. Some patterns change colour within every row; others weave strands through an open mesh. This lesson uses a striped single-crochet background with two surface-crochet lines added afterwards. The vertical lines sit on the face of the fabric rather than replacing its background stitches.
You will make a small thirteen-stitch, nine-row swatch, then follow two marked routes across its stripes. The aim is to keep the fabric relaxed and the lines aligned. This is an original practice arrangement, not a traditional tartan specification or a complete blanket pattern.
Use US stitch names throughout. Single crochet is UK double crochet. If the surface-chain movement is new, work through the surface-crochet lesson before starting the colour arrangement.
What You'll Learn
By the end of this tutorial you will be able to:
- Make a thirteen-stitch striped base
- Mark two fixed surface routes
- Work nine relaxed links along each line
- Keep decoration separate from the background count
What You Need
Smooth yarn suited to the exercise; choose compatible contrasting colours where requested
A comfortable hook suited to your practice yarn
Locking markers or contrasting yarn scraps, Scissors, Blunt yarn needle
Use the materials above for practice, adjusting the hook if needed for comfortable stitches. For a finished project, follow its pattern’s yarn, gauge and care requirements.
Abbreviations
| Abbr | Full Term |
|---|---|
| ch | chain |
| sc | single crochet (US; UK double crochet) |
Choose colours with different jobs
Choose three smooth yarn colours of similar thickness. Colour A makes most of the background, B makes a horizontal band, and C draws the two surface lines. A pale blue background, cream band and rust lines are one possible combination; use scraps you can distinguish easily.
Use a comfortable hook for the yarn, two markers or scraps, scissors and a blunt yarn needle. A separate larger hook can be useful if the surface chains are consistently too tight, but inspect their loop size before changing tools.
Avoid fuzzy or very dark yarn for the first attempt. You need to locate the spaces between columns without splitting the background yarn. Similar yarn weights also make it easier to judge whether puckering comes from the surface tension rather than a much bulkier overlay.
Before starting, check that all three yarns can share a suitable care method. A surface line and its background may respond differently to washing even when both balls recommend the same hook size.
Make a thirteen-stitch background
With A, chain fourteen. Single crochet in the second chain from the hook and in each remaining chain: thirteen single crochets. Mark the first and last top Vs. The skipped chain does not count as a stitch.
For rows two and three, chain one and turn, then single crochet in all thirteen stitches. Each beginning chain is uncounted. You now have three rows in A, containing thirty-nine single crochets altogether.
Change to B by using B for the final pull-through of the last single crochet in row three. That stitch still belongs to row three; the colour used to close it does not create a fourteenth position. Leave tails for finishing rather than knotting short ends against the edge.
Work rows four and five in B, keeping thirteen single crochets in each. On the final pull-through of row five's last stitch, change back to A. Work rows six through nine in A, again thirteen stitches per row.
The completed background contains nine rows and 117 single crochets: seven A rows and two B rows. The band is deliberately off-centre, with three A rows below it and four above it. Eight between-row turning chains are outside the stitch total.
Fasten off and finish the background ends. Lay the swatch down without stretching it square. If the rows contain different counts or the edges are already drawing in, correct that before adding a line that could hide the problem.
Mark the routes on one fixed face
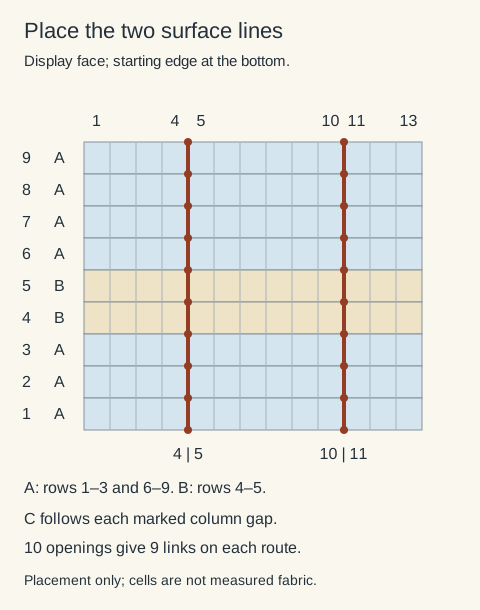
Choose the face you want to display and keep it facing you while marking. Place the starting edge at the bottom, with row one nearest you and row nine furthest away. Define columns one through thirteen from left to right in this view, regardless of which hand holds your hook.
Mark one vertical route in the gap between columns four and five. Mark a second between columns ten and eleven. These numbers describe gaps between stitch columns, not instructions to insert through the yarn strands of stitch four or ten.
On each route, identify ten openings: the lower edge before row one, the eight boundaries between successive rows, and the upper edge after row nine. Each move from one opening to the next crosses one row. Nine moves therefore make nine visible surface-chain links.
If an opening is not immediately visible, gently separate the adjacent stitches with the hook tip rather than stabbing through a strand. An opening slightly to one side is better than a split yarn, but a route that repeatedly wanders into another column should be remarked before continuing.
The colour-grid guide explains why a fixed picture direction and a row's working direction must be kept separate. You are following the fixed picture here; you will not turn the swatch after every surface link.
 View diagram larger (opens in a new tab)
Draw the first surface line
Keep C behind the swatch. Insert the hook from front to back through the first marked lower-edge opening and draw a loop of C to the front, leaving a tail behind. Secure the start as described in the surface-crochet prerequisite. This starting loop is not one of the nine visible links.
- Insert the hook from front to back through the next marked opening, one row further up the route.
- Catch working C behind the fabric and draw it through the opening, then through the loop already on the hook.
- Let the new link span the gap without gathering the background. One live loop remains, ready for the next opening.
Continue through the remaining openings in order, finishing at the upper edge. There are nine surface-chain links between the ten marked openings. The background still has thirteen stitches in each row; the overlay links are a separate count.
Support the fabric from behind as the hook enters. Let each new link reach the next opening without pulling the previous one into a tight knot. Put the swatch down after a few links to check that it still rests in its original shape.
At the upper edge, cut C with a finishing tail and draw the tail through the live loop. Use the needle to take it discreetly to the back beside the last attachment, following the finishing method in the surface-crochet lesson. Do not pull the end so tightly that the final link disappears.
Add the second line and inspect the crossings
Work a separate line in C along the gap between columns ten and eleven, again from the lower edge to the upper edge. Follow the same ten-opening, nine-link route. Using the same travel direction makes the two chain lines easier to compare.
The two lines contain eighteen visible links altogether. They cross the B band at rows four and five, but they do not change colour or acquire extra links at those crossings. Each link crosses a row of the existing fabric, whatever its background colour.
Look at the back. C should travel between neighbouring attachment openings, without a long loose float skipping several rows. The line belongs mainly to the chosen display face; the two faces will not look identical.
If one line is shorter and puckers the swatch, undo that line and remake it with more relaxed loops. Stretching the background hard to match a tight overlay can distort the thirteen-column grid. A larger hook can help, but the new links still need enough yarn to span their actual route.
If a link has wandered sideways at the horizontal stripe, locate the row boundary again. Colour can make a gap easier or harder to see; it does not move the underlying stitch columns.
Develop a larger plaid from the sample
To change the design, sketch the horizontal row bands and vertical routes separately. Wider horizontal bands require more background rows. Wider vertical bands require additional parallel surface lines or another defined technique, not extra stitches forced into the same single route.
On this thirteen-column sample, the lines are six stitch-column gaps apart. That spacing is a position count, not a measured distance. For a blanket, use your actual gauge measurement to work out the background dimensions and allow extra yarn for every surface line.
Finish the surface tails on the back without gathering the fabric. Follow a care method suitable for all the materials and compare the relaxed dimensions before and after. Surface crochet adds yarn and texture, so assess the finished fabric rather than assuming the background gauge remains unchanged.
Keep this sample as a record of the construction. When choosing another plaid pattern, first identify whether its verticals are crocheted into the rows, woven afterwards or worked on the surface. Those methods can produce related appearances while requiring different counts and yarn handling.
Ready for your next little make?
Keep learning with this free lesson, or explore complete crochet project PDFs in the shop, with materials, measurements, construction photos and finishing guidance.
What to Make Next
Three logical next steps to continue practicing:
Surface Slip Stitch Crochet: Add a Line Without Puckering
Continue with the related stitch, chart or finishing method.
Single Crochet: The Foundation Stitch for Every Project
Continue with the related stitch, chart or finishing method.
How to Join a New Ball of Yarn in Single Crochet
Continue with the related stitch, chart or finishing method.