


Corner-to-Corner Crochet: Make and Count Diagonal Blocks
By The Slow Stitch · Terminology: US Crochet Terms · Reading time: 10 min read · theslowstitch.com
Corner-to-corner crochet grows a piece from small blocks instead of one long starting row. The blocks sit across diagonal rows, with the direction changing when you turn. Count the blocks first, then check how their chains and stitches connect.
This lesson uses US double crochet (UK treble). Each block has a chain-three side and three actual double crochets. Begin with a plain four-by-four-block sample. A separate four-by-six variation shows why a rectangle needs a middle phase. These are practice shapes, with no promised finished dimensions or yarn quantity.
Review double crochet and chain spaces if needed. Keep the chart-reading lesson nearby when comparing the diagonal grid with your fabric.
What You'll Learn
By the end of this tutorial you will be able to:
- Make a complete diagonal block
- Grow to four blocks across the widest row
- Decrease at both ends without an extra block
- Read the block grid and extend a rectangle
What You Need
Smooth yarn with clear chains and stitch tops; one colour for the first sample
A comfortable hook suited to the practice yarn
Removable markers or contrasting yarn scraps, Scissors, Blunt yarn needle
Use the materials above for practice, adjusting the hook if needed for comfortable stitches. For a finished project, follow its pattern’s yarn, gauge and care requirements.
Abbreviations
| Abbr | Full Term |
|---|---|
| dc | double crochet (US; UK treble) |
| ch | chain |
| sl st | slip stitch |
Prepare to count blocks rather than individual posts
Use smooth yarn, a comfortable matching hook, two openable markers or contrasting scraps, scissors and a blunt yarn needle. One yarn colour is enough for the first sample. Choose a yarn that lets you see the chains and stitch tops.
In this version, an ordinary block has a chain-three side and three actual double crochets. The chain provides height and an opening used to connect the next row. Count that whole unit as one block, rather than counting the chain and each double crochet as separate chart cells.
A slip stitch moves or connects the working loop without making another block. Insert into the named stitch or space, yarn over, and draw through the target and the active loop in one movement. Keep these joins comfortable enough to enter again.
Leave each completed row unturned until the next row's instructions tell you to turn. That keeps the turning movement from happening twice at the change from increasing to decreasing.
Make the first block
Chain six. Double crochet into the fourth chain from the hook, then into each of the next two chains. You have three actual double crochets and a chain-three side beside them: one block for row one.
Keep the chain-three opening visible. Do not add another double crochet into it now. It will become a connection point when the next row reaches this block.
The loop on the hook is still the active loop. Neither it nor the slip knot is an extra block. Leave the work unturned for the moment.
Increase to two blocks in row two
Turn the work. Chain six and make a double crochet into the fourth chain from the hook and each of the next two chains. This creates the new row's first block at the outer edge.
Bring that block alongside the first row without twisting the fabric. To make the next block:
- Find row one's chain-three opening.
- Slip stitch through the space, underneath the chain arch, to connect the new block.
- Chain three, then make three double crochets into that same opening.
This makes row two's second block. Its posts run across a different direction from the neighbouring block, which is part of the construction.
Count two complete blocks in the new diagonal row. The slip-stitch connection between them is not a third block. Leave the work unturned.
Grow the square through rows three and four
For row three, turn and make the same new outer-edge block: chain six, then double crochet into the fourth chain from the hook and the next two chains.
To continue across, find the next chain-three space of the previous row. Slip stitch into it, chain three and make three double crochets in the same space. Repeat that connection-and-block movement in the remaining chain-three space. Row three contains three blocks: one new edge block and two blocks worked into previous-row spaces.
For row four, turn and repeat the process. Begin with one new edge block, then connect and make one block in each of the previous row's three chain-three spaces. Row four contains four blocks.
The totals so far are 1, 2, 3, 4. Each new row has grown by one block overall. Do not expect two extra blocks simply because both sides of the growing triangle extend.
Stop increasing here for the square sample. Four blocks is the widest diagonal in this practice shape, not an instruction to work four ordinary double crochets across the next row.
Decrease at both ends for row five
Turn, then chain one. This chain is only for moving into the travel stitches; it does not count as a block or another double crochet.
Slip stitch into each of the three actual double crochets of the block at the beginning of the row, then slip stitch into that block's chain-three space. Do not make the chain-six outer block used on an increase row.
In the space you have reached, chain three and make three double crochets. This is the first block of row five.
Continue across the old row's spaces. In the next space, slip stitch, chain three and make three double crochets for block two. Repeat in the following space for block three.
One final chain-three space remains at the far edge. Slip stitch into it to connect the row, but do not chain three or make another group there. This finishing connection holds the edge inward instead of extending it with another block.
Row five has three blocks. Check both decisions: no new outer-edge block at the start, and no new block in the last joining space. The resulting diagonal has one fewer block than row four, not two fewer.
Close the square with rows six and seven
For row six, turn, chain one and travel by slip stitching across the first three actual double crochets and into their chain-three space. Make the first block in that space. Make the second block in the next space, then slip stitch into the last space without making another block. You have two blocks.
For row seven, turn, chain one and travel in the same way. Make one block in the first space reached, then slip stitch into the only remaining space at the far edge. Do not make a second block there.
The completed diagonal totals are 1, 2, 3, 4, 3, 2, 1. They add to sixteen blocks, matching four columns by four rows of cells. Each block contains three actual double crochets, but its chart cell is the whole block.
Fasten off and secure the tails using the finishing lesson. Check the square without stretching it into shape. A four-by-four-block plan does not guarantee equal measured sides with every yarn and tension.
Read the numbered block grid
The accompanying grid numbers the sixteen blocks in working order. Diagonal row one contains block 1; row two contains blocks 2 and 3; row three contains 4, 5 and 6; row four contains 7 to 10. The shortening diagonals contain 11 to 13, then 14 and 15, then 16.
The grid uses a right-handed start at the bottom-right corner. Follow the arrows and alternate direction along the diagonals. Keep the chart's intended viewing face fixed when turning the fabric to work.
For this plain exercise, a left-handed maker can mirror the complete grid and all its arrows together, keeping the same diagonal totals. Do not apply that choice automatically to lettering or an asymmetrical project with its own reading instructions.
The numbers show order, not colour changes or individual double-crochet positions. Photographing a block from a different angle can make its posts look vertical or horizontal; the chain-space connection and the working sequence identify it more reliably.
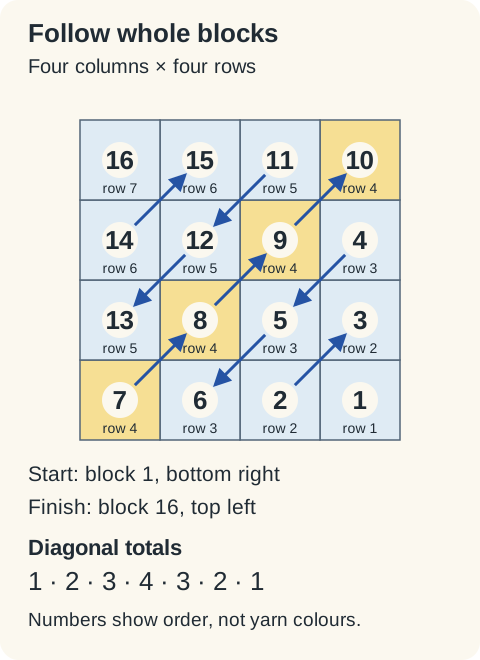 View diagram larger (opens in a new tab)
Add a middle phase for a four-by-six rectangle
Begin another sample and work the first four increasing rows as before. Before turning after row four, mark the outside edge where you have just finished. Call that edge A. The opposite expanding edge is B.
For row five, turn and begin at A with the decreasing start: chain one, slip stitch across three double crochets and into the chain-three space, then chain three and make three double crochets there. Continue by connecting and making a block in every remaining space, including the final one at B. Four old spaces receive four new blocks. Edge A stays fixed while B continues to grow.
For row six, turn and begin at B with the increasing start: chain six and make the new outer block. Make a block in each following space except the final space at A. Slip stitch into that final space and stop without making a block there. The new outer block plus three further blocks gives four again.
For rows seven, eight and nine, use the both-ends decrease sequence from the square exercise. Their totals are three, two and one blocks. Finish as before.
The rectangle's totals are 1, 2, 3, 4, 4, 4, 3, 2, 1: twenty-four blocks for a four-by-six grid. The repeated totals in the middle come from different start and finish instructions. Keeping four blocks while changing the wrong edge does not make the intended rectangle.
Practise one colour change after the plain sample
On another increasing triangle, try making row three's first block in blue and its following two blocks in gold. Make the first two double crochets of the blue starting block normally. Work its third double crochet until the last yarn-over and pull-through, leaving two loops on the hook.
Use gold for that final yarn-over and pull through both loops. The blue block is complete, with gold now active. Slip stitch into the next old chain-three space using gold, then chain three and make three double crochets there. Continue in gold for the final block of that row.
The row still has three blocks. The colour change did not add a stitch, chain or block. Leave accessible tails and secure them in routes suited to the fabric after checking the change. Do not pull the loose ends hard enough to gather the join.
For more complicated colour layouts, use a pattern's chart and yarn-supply plan. Do not carry an unused strand across a long open area merely because it is waiting at the other edge.
Correct the edge movement before adding more rows
If a decreasing row has the same number of blocks as the previous row, check whether you made a block in the final space instead of stopping after its slip stitch. Also check for an accidental chain-six starting block.
If two blocks disappeared, count the first block made after the travel slip stitches. The space reached at the beginning still receives a block. Compare each connection with the previous row before removing the whole diagonal.
If blocks twist apart, inspect whether the slip stitch entered the intended chain-three space. If the outline is correct but the measurements differ from the project, use the gauge guide rather than changing the row totals at random.
Keep the block definition, diagonal totals and two edge rules together. They are three separate checks, and a larger picture needs all of them.
Ready for your next little make?
Keep learning with this free lesson, or explore complete crochet project PDFs in the shop, with materials, measurements, construction photos and finishing guidance.
What to Make Next
Three logical next steps to continue practicing:
Classic Granny Square: The Step-by-Step Method
Review the related stitch, chart or finishing method.
Double Crochet: Faster, Softer Fabric in US Terms
Review the related stitch, chart or finishing method.
How to Read a Crochet Chart: Visual Symbols Explained
Review the related stitch, chart or finishing method.