

Amigurumi Assembly: Plan Placement Before Sewing
Small changes in placement can give a crocheted figure a very different expression or posture. Before threading a needle, arrange the pieces, check their orientation and decide which seams must be completed while an opening is still accessible. This is an assembly-planning guide.

The pattern must supply the specific attachment method and locations. It does not establish that a finished figure is suitable as a child's toy.
Check each part before arranging it
Confirm the piece's stitch and round counts, finish and intended outer face. Compare matching parts after the same filling and care treatment. Two limbs made with the same count can still differ if their gauge or filling differs. If the fabric opens as you fill it, use the stuffing-gap checks before attaching the part.
Keep the labels or markers used to identify the beginning of a round where they remain useful. In a spiral, the start is a counting reference, not automatically the centre front. The amigurumi basics lesson explains that construction.
Leave an attachment tail if the pattern calls for one. Do not trim it or close an opening merely to make the loose pieces look finished.
Read the entire assembly order
Check whether one part must be attached before another covers its seam or blocks needle access. Some attachments are made during crocheting; others use a finished opening, a flattened edge or two closed surfaces.
Those connections need different methods. Instructions for sewing the open rim of a muzzle onto a closed head cannot automatically be used to join two flattened limbs or form a neck.
Write a short order list from the actual pattern. Mark any point where filling, an internal attachment or another component must be checked before closure. Do not assume every figure is assembled head-first or limbs-first.
Map the positions on the body
Use the pattern's stated rounds and stitch positions where supplied. Count from an identified reference and mark the centre or attachment line with removable markers or temporary contrasting thread.
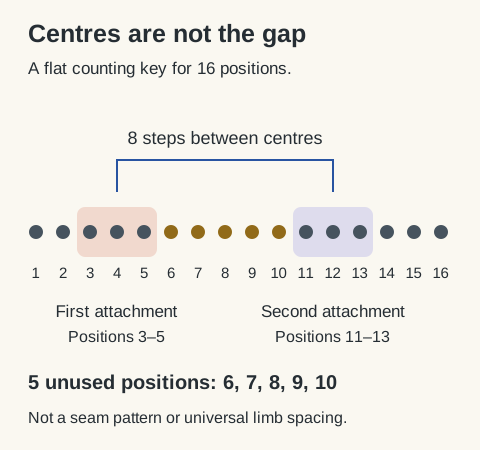
If the directions give a gap between two parts, check whether that gap means unused stitches between their nearest edges or a distance between their centres. Those measurements are different.
For example, two parts with centres eight stitch positions apart do not leave eight unused stitches between their rims. In a flat planning example numbered 1 to 16, let one attachment occupy positions 3 to 5 and the other positions 11 to 13. Their marked centres are 4 and 12, eight steps apart, but only positions 6 to 10 lie between the attachment areas: five unused positions. This is a counting example, not a seam pattern or recommended limb spacing. Sketch the attachment outlines if the wording is unclear, and ask the designer before sewing.
Arrange the whole figure before committing
Hold or temporarily secure the pieces in their intended positions using a method appropriate to the material. Inspect from the front, back and sides. If using pins, count them, keep their points controlled and remove every one before the figure leaves your work area.
Check matching parts together. Compare their distance from a centre line, their angle and the direction their openings or shaping face. Deliberate asymmetry is fine when the design calls for it; accidental drift is easier to correct now.
Look at the silhouette as well as individual stitch coordinates. Filling and shaping can change how an attachment sits on a curved body. A round number alone does not tell you whether a limb is pointing in the intended direction.
Match the seam to the actual connection
Use the named sewing method and insertion points. A neat seam depends on the route through the two fabrics, not simply on pulling a strand tight until it disappears.
Work a small section, then stop and check alignment. If the pieces have shifted, undo that section while it is accessible. Tightening the remaining stitches more strongly can pull the shape sideways instead of correcting the earlier placement.
Keep the single crochet lesson available to identify stitch tops. Where the attachment uses a different part of the fabric, follow its specific directions rather than defaulting to every visible top V.
Inspect before hiding the final tail
Check the attachment from several angles and examine the entire seam for missed positions or exposed gaps. Handle it as intended by the project without treating an improvised pull test as safety certification.
Secure the sewing ends using a finish suited to the yarn and construction. The weaving-in guide gives related end-handling context, and the care lesson helps with the materials' restrictions.
Record any placement correction before making the second figure or matching part. Exact notes and your own photographs are more useful than relying on memory of where the first seam looked right.
Needle, scissors and finishing supplies
A blunt yarn needle and small scissors are useful for weaving ends and assembly. Choose the needle eye for your yarn and use scissors suited to cutting yarn. Store sharp tools safely.
Susan Bates 70773 Blunt Steel Yarn Needles, Size 16, Five-PackView on Amazon Jaasuee J5064 Embroidery Scissors with Protective Sheath, 3.62 InchesView on AmazonYour next step
Keep making. Keep learning.
Choose a route through the actual fabric that keeps the seam aligned and the ends accessible until the finish is checked.
Plan how the sewing tails will finish