

Flat Crochet Circles: Check Increases, Cupping and Ruffles
A circle that cups upward and one that forms a frill need different checks. Before adding or removing increases, compare the actual round count with the pattern and establish whether the piece is meant to be flat at this stage. A basket base may turn into sides deliberately; an amigurumi body may begin curving after its increase rounds.

This guide uses US terminology and explains increase arithmetic and diagnosis, not a guaranteed flat-circle pattern for every yarn.
Start with the stitch and construction
Identify the stitch used for the body of the circle. Its width and height affect how much fabric a new round needs around the growing circumference. A starting count used for single crochet does not automatically suit a taller stitch.
Check whether rounds are joined or continuous, whether the work turns and whether any beginning chain counts. The rows, joined rounds and spirals guide separates those construction choices. Those details determine the usable positions. Do not count a joining slip stitch as an extra ordinary stitch unless instructed.
Use the magic ring lesson to review a centre start and the amigurumi lesson for one defined spiral construction. Their instructions serve those exercises; they do not establish one increase schedule for every circular project.
Separate an increase from its placement
For an ordinary two-in-one single crochet increase, two completed stitches share one old base. You use one position and create two, increasing the total by one.
If the next stitch is an ordinary single crochet, you use another base and make one more stitch. Reading the insertion points matters as much as reading the total. The single crochet lesson explains how to identify those bases and tops.
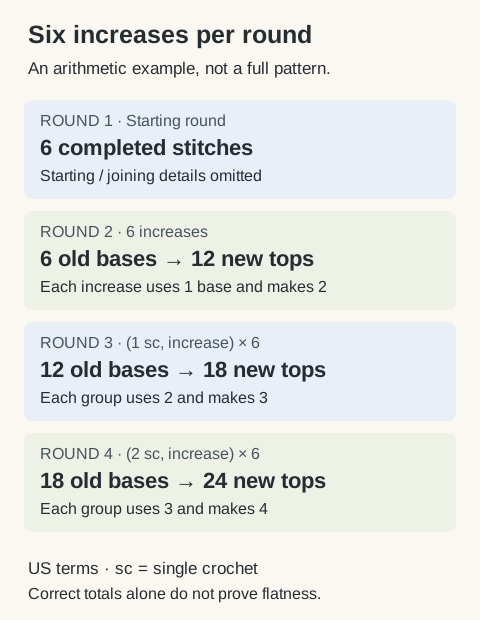
Here is an arithmetic example using a familiar six-increase schedule:
- A first round contains six stitches.
- Two stitches in each old base produce twelve.
- Six groups of one ordinary stitch followed by an increase consume twelve bases and produce eighteen stitches.
- Six groups of two ordinary stitches followed by an increase consume eighteen bases and produce twenty-four stitches.
This demonstrates the count progression. It omits starting, joining and turning details, so it is not a complete set of working instructions. Nor does the progression prove that every sample will lie flat.
Check cupping against the expected count
If the fabric rises into a bowl earlier than the pattern intends, first recount the current and preceding rounds. Look for a missed increase, an omitted starting position or a round repeated without its required shaping.
Compare the first point where the actual count differs from the written total. Correcting only the latest round can leave an earlier shortage below it.
If the counts and placements match, compare the yarn, hook, stitch method and fabric with the intended sample. A different stitch proportion or gauge can change the shape. Simply pulling harder on the yarn is not a reliable way to supply missing circumference.
Check ruffles for extra fabric
A wavy edge can indicate excess fabric for the area it surrounds. Check for an extra increase, a repeat worked too many times, or the joining area accidentally treated as another base.
Also compare stitch size. Loose new rounds around a much tighter centre may behave differently even when the totals follow the pattern. Keep the sample relaxed while assessing it; stretching a ruffle outward can hide the shape temporarily.
For an improvised circle, any adjustment needs to be tested in the actual fabric. For an existing checked pattern, confirm the count and gauge before rewriting its increase schedule.
Distinguish corners from too many increases
Placing increases above the same locations in successive rounds can make visible lines or angles. That is a placement effect worth distinguishing from a whole edge that ruffles.
Some designs stagger increases. Staggering changes their location, not necessarily their number. If a round is supposed to add six stitches, moving the six increases does not turn it into a twelve-increase round.
Count the bases consumed by any rewritten repeat. If you split a group at the beginning and end to offset the increase, those partial groups together must still account for the correct number of bases. Do not improvise extra edge stitches to make a repeat fit.
Use measurements as evidence, not a shortcut
The gauge guide helps you record the fabric. A diameter measured across a few early rounds does not prove the final piece will stay flat, particularly after a yarn, stitch or colourwork change.
Inspect the circle at intervals and record the round number, stitch total and where the shape changes. A basic count calculation is a checkpoint; the made sample tells you whether that particular combination behaves as intended.
Finish only by a process compatible with the yarn and project. The blocking and care lesson explains those choices. Blocking can relax some fabric, but it does not replace missing increases or remove surplus stitches from the structure.
Locking stitch markers
Openable markers help you find a stitch or the start of a round. A contrasting scrap of yarn works too.
Clover 3033 Quick Locking Stitch Marker SetView on AmazonYour next step
Keep making. Keep learning.
Compare the lesson’s own start, counted stitches and shaping instructions; use your fabric to assess its actual shape.
Follow one defined spiral exercise