


Join Granny Squares As You Go: Match Sides and Corners
By The Slow Stitch · Terminology: US Crochet Terms · Reading time: 10 min read · theslowstitch.com
With join-as-you-go crochet, you connect a motif while making its final round. The new stitches belong to the motif being completed; selected spaces or corners attach to a motif that is already present.
Begin with one joined edge between two small granny squares. Then use the same defined spacing for a four-square arrangement, with an explicit target at the central meeting point. This lesson uses US double crochet (UK treble) and three-round squares based on the classic granny-square lesson.
This is one joining version, rather than a rule for every granny motif. Its corners keep a chain on each side of the joining slip stitch. Other versions replace different chains, enter individual chain links or release and pull through the active loop; do not mix those movements into this exercise.
What You'll Learn
By the end of this tutorial you will be able to:
- Match the corner and side openings
- Attach an edge during the final round
- Keep both stitch groups in the new square
- Use one central corner target in a four-square join
What You Need
Compatible yarn in two contrasting colours for the two motifs
A comfortable hook suited to the practice yarn
Removable markers or contrasting yarn scraps, Scissors, Blunt yarn needle
Use the materials above for practice, adjusting the hook if needed for comfortable stitches. For a finished project, follow its pattern’s yarn, gauge and care requirements.
Abbreviations
| Abbr | Full Term |
|---|---|
| dc | double crochet (US; UK treble) |
| ch | chain |
| sl st | slip stitch |
Prepare a finished square and an unfinished partner
Use the same suitable hook and yarn for both motifs. Two contrasting colours help distinguish the completed square from the one you are joining. Keep four removable markers, scissors and a blunt yarn needle nearby.
Make square A through round three of the classic lesson. Its third round has thirty-six counted double crochets, including the beginning chain, four corner chain-two spaces and eight side chain-one spaces. There are three groups of three double crochets along each side. Each corner contains two groups: one finishes the arriving side and the other begins the next side.
Finish A and secure its active loop. Check its count and shape before using it as the reference for another motif. Do not expect the join to correct an extra group or a missing corner.
Make square B through round two, which has twenty-four counted double crochets, four corner chain-two spaces and four side chain-one spaces. Fasten off so you can begin its third round in a convenient corner with a fresh length of yarn.
Both motifs should have comparable stitch size before joining. B is smaller at this stage because its third round is not yet made. You will compare the completed edges after that round, rather than stretching B's two-round edge to fit A's three-round edge.
Match four joining points in working order
Lay A and B with their right sides facing upwards, beside each other. Choose one edge of B that will meet an edge of A. Keep the motifs side by side rather than placing their right sides against one another.
On A's selected edge, identify four attachment points: the first corner chain-two opening, the next side chain-one opening, the following side chain-one opening and the far corner chain-two opening. Put markers in the two corner openings while learning. Do not include openings from the round beneath.
On B, identify the round-two corner where that joining edge begins, its single side chain-one space and the next corner. As round three grows, those old positions will produce two new side gaps and the corner turns needed to align with A's four attachment points.
Use working order to name near and far along the chosen edge. Left- and right-handed makers encounter the route in opposite directions. Rotate the whole arrangement as needed while keeping the chosen right sides visible; do not turn one motif over independently to make a target easier to reach.
Start B's third round before the joining edge
Choose the round-two corner one side before B's joining edge in your normal working direction. Join the new yarn there. Chain three, counting it as the first double crochet, then make two double crochets, chain two and three double crochets in the same corner space.
Work the first unjoined side: chain one, make three double crochets in the next round-two side space, then chain one. You are now at the corner where the chosen joining edge begins.
The start of the round is deliberately away from that joined edge. Keep its counted chain-three top marked so you can finish the round there later. Do not treat the joining slip stitches described below as new starting or ending points for the whole round.
Make the first corner attachment
Make the corner in this order:
- Make three double crochets in B's next old corner space, then chain one.
- Keep the working yarn attached to B. Insert the hook through A's corresponding first corner opening, from its display side to the back.
- Yarn over with B's working yarn. Draw it through A's opening and the active loop on the hook in one slip-stitch movement.
- Chain one, then make three more double crochets in B's same old corner space. The corner sequence on B is therefore 3 dc, ch 1, slip stitch into A's corner, ch 1, 3 dc.
The two double-crochet groups are both made in B. Only the joining slip stitch enters A. Do not move the second group into A's corner, and do not also make B's ordinary chain two at this corner.
Let the motifs rest together. Keep the connecting stitch relaxed without leaving a long loose loop. The added connection can affect the corner's spacing, so assess the actual join rather than promising that every yarn will produce the same gap.
Attach the two side gaps
Where B would next make a side chain one, make a slip stitch into A's next side chain-one opening instead. Use B's working yarn and the same front-to-back entry through A's opening. This slip stitch replaces that one side chain; do not add another chain beside it in this version.
Return to B and make three double crochets in its next round-two side chain-one space.
Replace B's next side chain one with another slip stitch into A's following side chain-one opening. You have now reached B's next old corner.
There are two side attachments, in order, between the two corner attachments. Do not enter a double-crochet top simply because it is closest to the hook. Each target here is the opening between groups on A's completed third round.
Make the far corner and finish the round
In B's old corner, make three double crochets, chain one, slip stitch into A's far marked corner opening, chain one and make three double crochets in B's same old corner.
Continue around B's remaining two unjoined sides as in an ordinary third round. Along each side, chain one, make three double crochets in the next old side space and chain one. At the remaining unjoined corner, make three double crochets, chain two and three double crochets.
After the final side, join with a slip stitch into the top of B's marked beginning chain three. This closes B's own round. It is separate from the four attachment slip stitches into A.
Check thirty-six counted double crochets around B. The two joined corners each have a chain-one, attachment and chain-one sequence; the other two corners retain ordinary chain-two turns. Six ordinary side chain-one gaps remain, with two side gaps replaced by the side attachment stitches.
The joined edge has four attachment points: corner, side, side, corner. The three double-crochet groups along that edge are still B's own groups. Finish and secure the tails after inspecting both faces.
Extend the plan to four squares
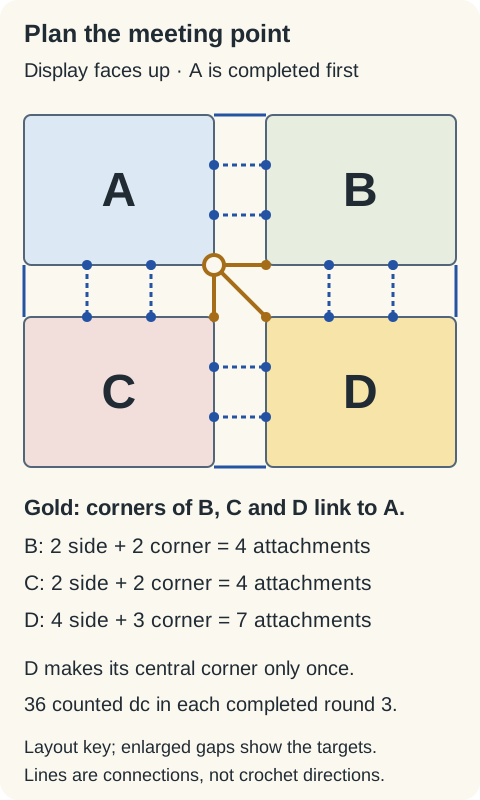
For the next exercise, arrange the motifs as a two-by-two grid: A at the upper left, B at the upper right, C below A and D below B. The first A-to-B join is already made.
Make C through round two. Add its third round while joining one edge to A's bottom edge with the same four-point sequence. At the corner where A, B and C meet, attach C's corner to A's original corner opening, even though B already has a corner attachment there. Identify the opening before inserting; do not substitute the top of B's joining slip stitch.
Make D through round two. Its third round will join two adjacent edges, one to B and one to C. Start far enough before those edges to follow the usual round direction without cutting across the motif. Which of those two edges is encountered first depends on the working direction and arrangement.
At the first outer end of a joined edge, use the ordinary joined-corner sequence into the corresponding completed motif's corner. Attach the next two side gaps in order while keeping the double-crochet groups in D.
Use one defined target at the central meeting point
When D reaches the corner between its two joining edges, make its first three double crochets in D's old corner and chain one.
For this four-square exercise, insert into A's original central corner opening, diagonally opposite D. Make one joining slip stitch there, chain one, then make the second group of three double crochets in D's same old corner.
This central corner is made once. Do not make another corner group or add separate corner attachments into B and C as well. Their neighbouring edges still receive D's normal side attachments as you work away from the centre.
Continue along D's second joining edge, attaching its two side gaps to the corresponding two side openings of the other completed motif. At the far outside end, make a joined corner into that motif's corresponding corner opening. Finish any remaining free side and close D's own round at its beginning chain.
Check seven attachments into existing motifs around D: four side attachments and three corner attachments. The central one is shared by the two joined edges. D still has thirty-six counted double crochets, three linked corner turns, one free corner chain-two turn and four ordinary side chain-one gaps.
The central opening of A now receives one corner attachment from each of B, C and D. That is the stated target for this small layout, not a universal instruction to use a diagonal square in every join-as-you-go pattern.
 View diagram larger (opens in a new tab)
Inspect alignment before hiding the ends
Lay the two-square or four-square sample down without stretching it. Check whether corresponding groups sit alongside one another and whether the attachment points follow the selected edge. Compare the reverse as well as the display face.
If a join pulls tight, inspect the attachment stitches before changing the double-crochet count. If the side gaps are mismatched, check whether one target was skipped, used twice or taken from a lower round.
At the four-square centre, distinguish A's original corner opening from the newer loops passing through it. Do not force the hook through a tightly bundled strand. If the target cannot be identified clearly, undo the nearby new section and make the arrangement accessible again.
Use the blocking and care lesson for care-compatible finishing. Blocking is not evidence that a twisted motif, wrong attachment or count error has been corrected.
Keep the yarn tails accessible until the alignment is satisfactory. Join-as-you-go still leaves ends to secure, and this exercise deliberately uses a fresh final-round yarn so the start is easy to place. It does not promise fewer ends or a particular amount of saved time.
Keep this join with its motif definition
A motif without side chain-one gaps needs another attachment plan. A larger granny side has more intervening gaps, while a shaped or solid motif may provide different targets entirely.
Record the selected spacing: chain-one, corner attachment, chain-one at joined corners; a replacement slip stitch at side gaps; and one central attachment into A for the four-square meeting. Do not switch to a chain-link join or a released-loop join halfway along the same edge.
Begin a larger layout only after the same method has a clear route through its outer edges and intersections. A pattern's complete joining instructions take priority over extending this small practice arrangement by guesswork.
Ready for your next little make?
Keep learning with this free lesson, or explore complete crochet project PDFs in the shop, with materials, measurements, construction photos and finishing guidance.
What to Make Next
Three logical next steps to continue practicing:
Classic Granny Square: The Step-by-Step Method
Review the related stitch, chart or finishing method.
Granny Square Variations: Open Spaces and a Dense Outer Round
Review the related stitch, chart or finishing method.
Blocking and Yarn Care: Shape and Finish Your Crochet
Review the related stitch, chart or finishing method.