


How to Filet Crochet: Open and Filled Mesh Cells
By The Slow Stitch · Terminology: US Crochet Terms · Reading time: 8 min read · theslowstitch.com
Filet crochet turns a grid of open and filled cells into fabric. The cells share boundary posts, so counting every drawn square as an independent group can make a row too wide. Define the unit before picking up the hook.
This lesson uses US double crochet (UK treble) and a mesh in which each new cell advances three stitch or chain positions. Five cells need sixteen positions across, including the first boundary. Other filet patterns can use a different cell size, turning chain or foundation setup; keep this exercise's rules together.
You should be comfortable with double crochet, chains and turning. Use the chart-reading lesson to review keys and row direction before following the small placement grid.
What You'll Learn
By the end of this tutorial you will be able to:
- Share the boundary between neighbouring cells
- Make open and filled mesh over either kind of cell
- Keep five cells between six boundary posts
- Follow the four-row placement grid
What You Need
Smooth light-coloured yarn with visible stitch tops
A comfortable hook suited to the practice yarn
Removable markers or contrasting yarn scraps, Scissors, Blunt yarn needle
Use the materials above for practice, adjusting the hook if needed for comfortable stitches. For a finished project, follow its pattern’s yarn, gauge and care requirements.
Abbreviations
| Abbr | Full Term |
|---|---|
| dc | double crochet (US; UK treble) |
| ch | chain |
| sl st | slip stitch |
Define the two cells and their shared wall
An isolated cell has a double-crochet boundary on each side. Between those boundaries:
- An open cell has a chain-two space.
- A filled cell has two actual double crochets.
The last boundary of one cell is also the first boundary of its neighbour. Work that shared post once. After the first boundary is present, each new open cell adds chain two and one boundary double crochet. Each new filled cell adds three double crochets: two interior stitches and the next boundary.
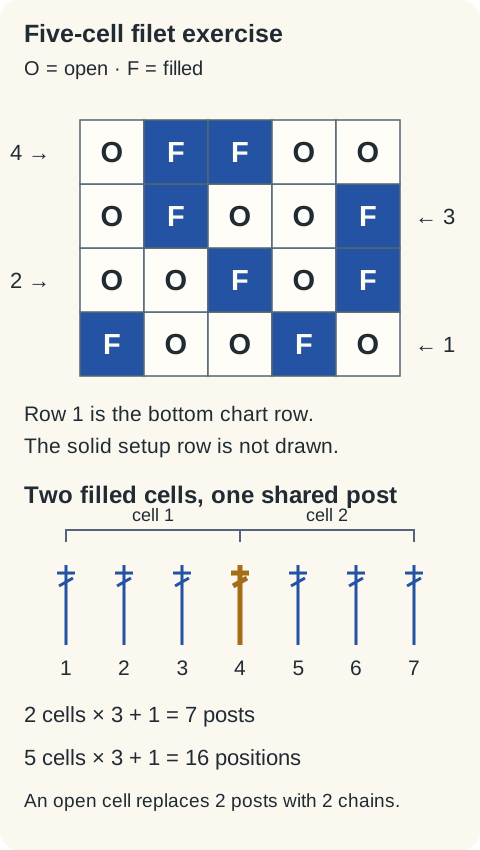
The width is therefore 3 × number of cells + 1. Five cells need fifteen advances plus the first boundary: sixteen stitch or chain positions. That total includes chains across openings; it does not mean every mesh row contains sixteen actual double crochets.
Use smooth, light-coloured yarn and a suitable hook, two openable markers, scissors and a blunt yarn needle. A larger yarn can make the structure easier to see, but no finished size is specified for this practice panel.
Make the solid setup row
Chain eighteen. Double crochet into the fourth chain from the hook, then make one double crochet into each remaining chain. There are fifteen actual double crochets plus the skipped chain three, which counts as the first double crochet: sixteen counted positions.
Call this the setup row, separate from chart rows one to four below. Mark the top of its counted beginning chain and the final actual double crochet. They are the two outer boundary positions.
Do not work sixteen actual double crochets as well as counting the beginning chain. That would change the width. Count before adding any mesh.
In the following rows, every beginning chain three counts as the first boundary post. Do not also work into the stitch directly beneath it. At the opposite edge, work the last boundary into the top chain of the previous counted beginning chain.
Learn an open cell over solid fabric
Turn and chain three for the first boundary of chart row one. The next cell in working order is open.
Chain two, skip the next two double crochets of the setup row, then double crochet into the following double crochet. That new double crochet is the far boundary of the open cell. The opening spans the two skipped positions.
Do not add another post before beginning the next cell. The boundary you just made will be shared with it. A chain-two space is one open area here, even though its two chains contribute two positions to the row-width count.
Check that the first chain-three boundary has not been counted as a complete additional cell. It begins the grid; it is not one of the five spaces between its six boundary posts.
Learn a filled cell over solid fabric
After that first open cell, the next cell in row one is filled. Make one double crochet into each of the next three setup-row stitches. The first two fill the cell's interior; the third is its far boundary.
Those three new stitches continue from the boundary already present. Two adjacent filled cells would add six new double crochets after their starting shared wall, making seven boundary-and-interior posts in the full two-cell section. They would not require eight separate posts.
Keep the stitches at a comfortable height. Do not pull the boundary tighter to make a cell look perfectly square. You will assess the actual proportions once several rows are present.
Complete chart row one
Read these five cells in working order, starting after the beginning chain-three boundary:
Open, filled, open, open, filled.
The first two are already made. Work the next two open cells by chaining two, skipping two old stitches and making one boundary double crochet for each cell. Then make the last filled cell with three double crochets across its remaining positions.
The final double crochet goes into the marked top of the old beginning chain. There should be no unworked setup stitch beyond it and no extra cell past the edge.
Row one has three open cells and two filled cells. Its six boundary posts plus four interior double crochets give ten counted double-crochet posts, including the beginning chain. Its three chain-two spaces contribute six chains. The width remains sixteen positions.
Work above an open or filled cell
For every new mesh row, turn and chain three for the first boundary. Then follow the cells in working order, using the structure directly below each cell:
- Open above open: chain two, leave the old chain-two space unworked, and double crochet into its far boundary post.
- Filled above open: make two double crochets into the old chain-two opening, then one double crochet into its far boundary post. The two interior stitches go around the chain arch through the opening, rather than into its individual links.
- Open above filled: chain two, skip the two interior double crochets, and double crochet into the far boundary post.
- Filled above filled: double crochet into each of the next three double crochets, ending in the far boundary post.
Keep the six boundary columns recognisable while the interiors change. Do not put another stitch into the boundary already used to finish the preceding cell.
At the far edge, the old beginning chain is a counted boundary. Its top chain receives the final double crochet whether the last new cell is open or filled.
Finish the four-row placement exercise
Work the remaining rows with the four cases above. Each list below is already in the order you encounter the cells while crocheting:
- Row two: open, open, filled, open, filled.
- Row three: filled, open, open, filled, open.
- Row four: open, filled, filled, open, open.
Each row contains five cells: three open and two filled. Each therefore has the same ten counted double-crochet posts and six chain positions as row one. The openings move, but the width does not increase or decrease.
The setup row is additional to these four chart rows. Fasten off and weave in the tails using the finishing lesson. Keep the ends within suitable solid fabric rather than crossing a visible open cell.
Compare the written order with the drawn grid
The accompanying grid shows the chosen right side of the finished sample, with row one at the bottom. Its right-handed arrows run right to left for rows one and three, and left to right for rows two and four.
Because the written lists above are in working order, odd-row lists appear reversed when you inspect the grid from left to right. For example, row one's displayed cells from left to right are filled, open, open, filled, open. Follow its right-to-left arrow to recover the written sequence.
The chart does not draw the separate setup row or add an extra square for the first boundary. Filled cells describe filled mesh, not a new yarn colour.
A left-handed maker can follow the same working-order lists to make the reflected placement exercise, or mirror the complete grid and its arrows together. Keep both descriptions in agreement. A project containing letters or a directional image needs its own orientation decision.
 View diagram larger (opens in a new tab)
Check the structure before adjusting the proportions
If the row grows, look for a boundary made twice or a double crochet placed beneath the counted starting chain as well as the chain itself. If it shrinks, check whether the top of the old beginning chain was missed at the far edge.
If a filled area has a hole, compare its placement with the four cases. Two interior double crochets alone do not finish a cell; its far boundary still has to be worked. If an open area contains an extra post, check whether the old shared boundary was used twice.
Count five cells between six boundary posts before judging the outline. The cells may be wider or taller than a drawn square with your yarn and tension. Use the gauge guide and the project's measurements when planning an actual item. Changing to a taller stitch creates a different version that needs its own checked sample and instructions.
Follow the yarn's care guidance and the blocking and care lesson when finishing. Do not force an incorrect stitch count into a rectangular outline. Keep the cell definition, chart direction and boundary count with the sample so they remain clear when you return to the technique.
Ready for your next little make?
Keep learning with this free lesson, or explore complete crochet project PDFs in the shop, with materials, measurements, construction photos and finishing guidance.
What to Make Next
Three logical next steps to continue practicing:
Double Crochet: Faster, Softer Fabric in US Terms
Review the related stitch, chart or finishing method.
How to Read a Crochet Chart: Visual Symbols Explained
Review the related stitch, chart or finishing method.
Blocking and Yarn Care: Shape and Finish Your Crochet
Review the related stitch, chart or finishing method.