


Crochet Seams: Whip Stitch and a Single-Crochet Join
By The Slow Stitch · Terminology: US Crochet Terms · Reading time: 8 min read · theslowstitch.com
A sewn seam and a crocheted join can connect the same edges but leave quite different results. A whip stitch wraps yarn around matching edge positions. A single-crochet join adds a new line of crochet, which can become a deliberate ridge on the front.
This lesson uses US terminology and gives both methods a small, matching practice edge. Neither method is automatically invisible, stretchy or suitable for every garment. The aim is to see where the needle or hook goes, keep the two edges aligned and compare both faces of the join.
What You'll Learn
By the end of this tutorial you will be able to:
- Match two edges before joining
- Sew a whip-stitch seam through matching stitch tops
- Make a raised single-crochet join
- Compare the joins and secure their tails
What You Need
Smooth yarn for four matching practice rectangles, plus yarn for joining
A hook suited to the practice yarn
Scissors, Blunt yarn needle with an eye that fits the yarn, Removable markers or yarn scraps to mark the faces and edge pairs
Use the materials above for practice, adjusting the hook if needed for comfortable stitches. For a finished project, follow its pattern’s yarn, gauge and care requirements.
Abbreviations
| Abbr | Full Term |
|---|---|
| sc | single crochet (US; UK double crochet) |
| ch | chain |
| st | stitch |
| RS | right side (chosen display face) |
| WS | wrong side (reverse face) |
Make four matching practice pieces
Choose smooth yarn and a hook suited to it. Make four small rectangles in the same yarn and stitch tension, using the single crochet lesson if you need to review the movement:
- Chain eleven for each rectangle.
- Row one: make one single crochet in the second chain from the hook and each remaining chain. You have ten stitches.
- Rows two to six: chain one, turn, and make one single crochet in each of the ten stitches. The turning chain does not count in this exercise.
- Fasten off after row six, keeping the final ten stitch tops easy to identify.
Use two rectangles for the sewn comparison and the other two for the hook join. The setup is four pieces of ten stitches by six rows, not a finished-project pattern. Join the last-row edges, where there are ten stitch tops on each piece; the vertical row-end edges have a different structure and are outside this exercise.
Choose which face you want to call the right side and mark it on each piece with a yarn scrap or openable marker. On a flat practice rectangle you can choose the display face. A project may assign its right side for you.
Match the ten pairs before joining
Lay two rectangles together with their last-row edges aligned. Match the first stitch with the first on the other piece and the last with the last. There should be ten pairs of stitch tops, with no spare stitch tucked past either end.
Put removable markers through the corresponding first and last pairs. Match the middle as well if that helps. Do not stretch one piece to force its edge to fit. If the counts differ, correct the practice pieces before beginning the seam.
For both methods below, use both top loops of each stitch. One pair therefore provides four top strands: two on one rectangle and two on the other. Other loop choices give different results, but keep this choice consistent while comparing the methods.
Sew the whip stitch with right sides together
Place the two marked right sides against each other, facing inwards. Align the two last-row edges at the top so you can see and enter the matching stitch tops. The wrong side of the nearer rectangle faces you.
Thread a blunt yarn needle with a manageable length of yarn. Matching yarn will make the wraps less noticeable; a contrasting colour makes their route easier to inspect. Leave a tail long enough to secure later, rather than pulling the first pass right through.
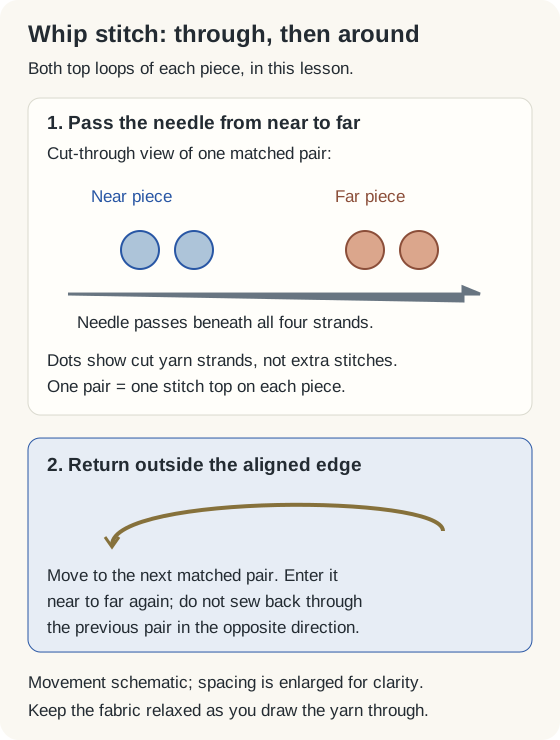
- Starting at either end of the matched edge, pass the needle beneath both top loops of the first stitch on the nearer piece and both top loops of its matching stitch on the farther piece. The needle travels from the near side to the far side through that pair.
- Bring the sewing yarn around the outside of the aligned edge to return to the near side. Do not sew back through the same pair in the opposite direction.
- Enter the next matching pair from near to far through all four top strands. Continue with the same wrapping direction, moving along one pair at a time.
Keep the wraps comfortable around the edge. Pulling hard can gather the seam or make the joined edge shorter than the rest of the fabric. After a few pairs, let the pieces relax and compare the joined section with the unjoined edge.
There are ten matched pairs to join. Do not add a pair for either turning chain or sew an extra loop past the final marked stitch. If one side seems to run out first, check for a skipped or repeated position before securing the yarn.
 View diagram larger (opens in a new tab)
Open and inspect the sewn seam
Once the last pair is joined, open the pieces so their right sides face you. The wrap line may still be visible, especially in contrasting yarn. Judge whether that appearance suits the project rather than expecting it to disappear completely.
Turn the work over and inspect the inside. Look for a consistent seam allowance without long loose floats or a hard gathered ridge. Gently flex the joined area; it should not pull the practice pieces into a cup or shorten the edge.
If the seam is comfortable and the edges match, secure the starting and finishing tails through the seam allowance or fabric with the yarn needle. Keep the tails from distorting the ten stitch positions. Do not trim them so close that they have no secure path through the fabric.
Work the single-crochet join with wrong sides together
Take the other two rectangles and place their wrong sides together, leaving the marked right sides on the outside. This puts the new single-crochet ridge on the display side when you open the pieces. Match the same ten pairs of last-row stitch tops.
Put a slip knot of the joining yarn on your hook and chain one for the start of this exercise. That starting chain provides room to begin; it is not one of the ten joining stitches.
- Insert the hook through both top loops of the first stitch on the nearer rectangle, then through both top loops of the matching stitch on the farther rectangle. Keep the existing active loop on the hook.
- Yarn over and pull the yarn through the two fabric edges. You now have two working loops on the hook: the original loop and the new loop you drew through the four top strands.
- Yarn over and pull through both working loops. One active loop remains. This is one single-crochet joining stitch.
Repeat through the next matched pair, keeping both top loops from each rectangle on every insertion. Ten pairs produce ten single-crochet joining stitches. Keep the initial chain separate from that count, and do not put another joining stitch into the final active loop.
If the four strands are difficult to enter, check the top Vs and remove any marker covering the pair you are using. Pushing through a split strand or forcing a too-tight join will make the placement harder to inspect.
Compare the ridge and the edge length
Open the joined pieces and look at the line of single crochets on the right side. This ridge adds texture and some bulk. Compare it with the sewn pair, then turn both comparisons over to see where the joining yarn sits on the reverse.
Let the pieces lie naturally. A tight line of joining stitches can pull the edge inwards; very loose loops can leave openings or a flared seam. Adjust the joining tension while the short sample is easy to undo. Changing how you hold the edges can help before a different hook size is needed.
Fasten off after the tenth joining stitch and secure both yarn tails. Use the finishing lesson for fastening off and tail handling. If the project needs washing or blocking, follow the yarn's care instructions and the blocking and care guide, then assess the joined fabric again.
These two joins establish matching top-edge methods. Seaming row ends, easing a sleeve into an opening and joining corners in several directions require their own placement decisions. Follow a complete project's assembly instructions instead of assuming that every edge should be joined one-for-one in exactly this way.
Ready for your next little make?
Keep learning with this free lesson, or explore complete crochet project PDFs in the shop, with materials, measurements, construction photos and finishing guidance.
What to Make Next
Three logical next steps to continue practicing:
Single Crochet: The Foundation Stitch for Every Project
Review the stitch used for these practice pieces.
Slip Stitch and Invisible Finishing: Neat Edges and Seams
Review fastening off before securing the tails.
Blocking and Yarn Care: Shape and Finish Your Crochet
Follow the yarn label when caring for the finished sample.