

Crochet Chain Stitch: How to Make and Count Chains
By The Slow Stitch · Terminology: US Crochet Terms · Reading time: 5 min read · theslowstitch.com
A chain is a line of linked loops. It can form the starting edge of a project, create a space between stitches or give you room to begin a new row. For now, practise making a short chain that you can see and count.
This lesson uses US terminology. The abbreviation is ch, and the basic chain stitch has the same name in UK instructions.
What You'll Learn
By the end of this tutorial you will be able to:
- Make a yarn over and draw it through the active loop
- Repeat the movement without adding an extra yarn over
- Count nine completed chain links and exclude the active loop
- Recognise the front Vs and raised back bumps
What You Need
A small amount of smooth yarn in a light or medium colour
A crochet hook suited to the yarn, with a clearly visible head and shaft
Use the materials above for practice, adjusting the hook if needed for comfortable stitches. For a finished project, follow its pattern’s yarn, gauge and care requirements.
Abbreviations
| Abbr | Full Term |
|---|---|
| ch | chain |
Set up your hook and yarn
Choose smooth yarn in a light or medium colour and a hook suited to it. Dark, fluffy yarn makes it harder to tell one link from the next. You only need a small amount for this exercise.
Put an adjustable slip knot on your hook. Let the loop rest on the straight shaft rather than tightening it around the narrower throat beneath the head. Keep the working yarn, which leads to the ball, separate from the free tail.
Hold the hook in whichever way lets your fingers move comfortably. With your other hand, guide the working yarn and pinch the knot beneath the hook. The yarn should feed when you need it. If you have to tug the ball along with every movement, unwind a little first.
Make the first chain
- Bring the working yarn over the hook from back to front. This is a yarn over.
- Catch that strand in the hook's groove. Turn the head slightly as needed to help it pass through the loop already on your hook.
- Draw the caught strand through that loop. The old loop becomes a completed link below the hook; a new active loop remains on the hook.
That is one chain. You do not need another yarn over to finish it.
If the hook snags, pause before pulling harder. Check that the old loop has room to pass over the head and that the hook has caught the whole strand rather than a few fibres.

Add more links
Repeat the yarn over and pull-through movement. After a few links, move your pinching fingers up the chain, keeping them a comfortable distance below the hook. Holding the original knot while the chain grows longer can make the work harder to control.
Let each new loop settle on the shaft before making the next chain. Aim for links of similar size, with enough room to insert the hook later. The chain does not need to look perfect on the first attempt.
Stop after nine completed chains. This is a counting exercise, not a project foundation or a promise of a particular finished length.

Count the nine chains
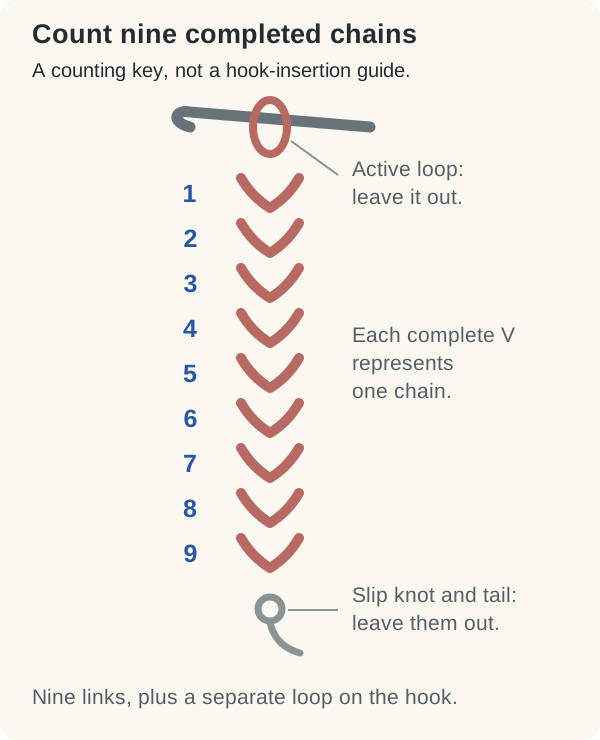
Lay the chain down without pulling it taut. On one face, the links look like a line of little Vs. Each complete V is one chain.
Start with the complete link nearest the hook and count towards the slip knot. Leave out:
- The active loop sitting on the hook.
- The slip knot at the beginning.
- The loose yarn tail.
You should find nine completed links, plus the separate active loop on your hook. If you find eight or ten, adjust the chain and count again before continuing. Checking a short length now is easier than discovering a missing chain halfway through a long first row.
 View diagram larger (opens in a new tab)
Find the two faces
Turn the chain over gently. Behind the Vs is a line of raised bumps. Patterns may ask you to work into a particular part of the chain. Follow that instruction; do not treat the back bump and a front strand as interchangeable without considering the resulting edge.
For this exercise, simply recognise the two faces. When you start a project, the pattern should also tell you which chain receives the first stitch. The loop on the hook is never the first chain in that count.
If your chain feels too tight
Relax your grip and check that you are sizing each loop on the shaft. You can try a slightly larger hook for the foundation, then return to the project hook, but test the resulting first row before committing to a long chain. An oversized foundation can make an edge loose or wavy instead.
If the chain twists, gently turn it until the links are visible. Twisting a loose chain while holding it is different from joining a foundation into a permanent twist. Check orientation before any pattern asks you to join its ends into a ring.
When you can make and count the nine links comfortably, try the single crochet lesson. It explains how to work into a foundation chain and count the completed first row.
Ready for your next little make?
Keep learning with this free lesson, or explore complete crochet project PDFs in the shop, with materials, measurements, construction photos and finishing guidance.
What to Make Next
Three logical next steps to continue practicing:
Single Crochet: The Foundation Stitch for Every Project
Use a foundation chain to make and count your first row.
Half Double Crochet: The Most Versatile Middle Stitch
After practising single crochet, learn the extra yarn over used for a taller stitch.
Slip Stitch and Invisible Finishing: Neat Edges and Seams
Learn how to fasten off and finish after following a complete set of project instructions.